Part II: Choosing A DAW
Your PC, Audio Interface, & Sequencer
At first glance, you may be asking yourself, “What the heck is a DAW?” No, it doesn’t mean “D’aww, she’s so cute” 😀 It means, “Digital Audio Workstation”. But Stu, that doesn’t explain anything! Ok, I will break it down further then:
A DAW is simply 3 things in your studio that are in conjunction with each other.
- Your Computer
- Your Audio Interface
- Your Recording or Music Production Software
Your Computer
Perhaps you already have a workhorse CPU. Maybe you don’t. Chances are you have something adequate, and that’s fine. There are a few things to consider when you are looking into computers and/or upgrades:
\RAM\
RAM stands for “Random Access Memory”, and it functions as the short-term memory of your PC and dictates how much it can handle at one time (i.e., windows open, programs running, etc.)
This also affects the speed at which you can do various tasks and how fast your PC responds.
Generally, I would say make sure this # is as high as possible (8 GB is adequate, but 16 GB has become sort of the standard). My setup now is running 32 GB, which is lightning-fast.
In 2019 I got a Lenovo X1 Extreme Laptop with all the bells and whistles and I love it. I previously had a Lenovo T510 with only 8GB of RAM. It’s incredible what a difference it makes when you’re doing a lot of things at one time.
\Hard Drive\
Speaking of enough, you can never have enough space on your computer for stuff and things. I have 1 TB (1000 GB) of hard drive space on mine right now and an extra 2 TB on 2 different external drives.
This affords you some wiggle room as you’re afforded plenty of space to store data/folders etc.
\Processing Speed\
For clarity’s sake, I have an Intel Core i7 8850H running at 2.60GHz. This is more than enough for me.
The point? Make sure your processing speed and your RAM capabilities both match. You don’t have to go crazy here, but don’t skimp either.
\Monitors & Video Cards\
When I had the T510, I upgraded my computer monitors to dual 24″ Asus PA 248’s. The X1 Extreme however displays 4k. I’d need 4k monitors to match, but I’ve decided to stick with the Asus’ for now as it’s not a top priority for me.
Still, if you haven’t seen what 4k looks like, you owe it to yourself. I’m kind of spoiled by it at this point.
I think the monitors are worth keeping because of how much room you’re afforded, plus, they still look excellent. While there is a difference in clarity/resolution and color, it’s not enough for me to go out and spend a bunch of money right away.


\Operating System\
At the end of the day, go with what you are most comfortable with. I have been using Windows since I was born, man (imagine Cheech Marin just said that).
I have experience with Mac and enjoy using them, but I choose to continue using Windows.
Maybe it’s tradition, familiarity, ease of use, or some other subconscious reason. Maybe it’s because I can vividly remember my first experience with computers and Windows 3.1.
The proof is right here:
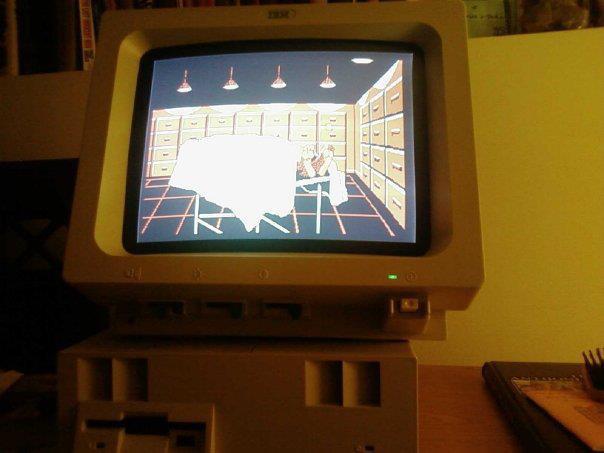
That is my dad’s old IBM PS/1 (model 2155) running on MS-DOS/Windows 3.1, with an Intel 80486SX processor @ 25 MHz and a memory of 6 MB (!!!).
Think about it like this: For comparison’s sake, my X1 Extreme runs at 2592Mhz! Unbelievable.
I played Wolfenstein 3D on that! You know, the first-ever 1st person shooter? Good times. Endless fun was had playing games like Duke Nukem, Crystal Caves, Wheel of Fortune, Wolfenstein, Shooting Gallery, and a whole slew of other stuff.
Remember floppy disks? No? Well, this thing used them. Yeah, I’m old.
Check out my article on The Best Headphones for Gaming for a trip down memory lane!
Soundcards & Audio Interfaces

This may perhaps be the most important component of your studio outside of the computer itself.
- Related: What does an audio interface do?
A good interface is priceless and will be the backbone of your whole rig. These powerful little boxes serve a few different purposes.
First and foremost, they can be referred to as external sound cards, but most people just use the term “interface” when referring to a device used to record things.
Internal Soundcards have their place (mostly in custom-built PCs), and every device that outputs sound (phones, tablets, laptops, etc.) has one, but we shan’t concern ourselves with them today.
- Related: What is a Soundcard?
In any event, both Soundcards and Interfaces (also known as DACS) allow your computer to send, receive, and process information.

- Get the rich, full album-ready sound of UA’s classic 610 preamps with Vintage mode
- Capture every detail and nuance of your performance with up to 24-bit / 192 kHz quality and crystal clear converters
- Record and mix with the award-winning LUNA Digital Audio Workstation, giving you the sound and workflow of a real analog studio
- Create using the same UAD plug-ins and instruments trusted by top industry pros for the sound of your favorite records
- Level up your recording and mixing skills with tips and tutorials for beginners to advanced users
They act as mediators between the analog (outside) and digital (computer) worlds.
- Required Reading: What is a USB DAC?
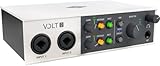
The above Universal Audio Volt 2 is what I use and recommend for people who only need at max 2 inputs.
A good interface should have 3 things:
- Good A/D converters: These convert the analog signal into a digital form (1s and 0s) that your computer can understand (also known as binary language).
- Microphone preamps: Takes the weak microphone signal and boost it to a higher level.
- Phantom Power: Provides your condenser microphone with the power to function properly.
Nowadays, it’s much easier to connect a MIDI device or Synthesizer to an interface like the Volt 2 that I have (pictured above).
Years back, MIDI cables were mandatory, but times have changed considerably.
The Volt 2 does have MIDI ports on the back, but they aren’t required anymore for most of the stuff that’s sold on Amazon.

That said, they do still come in handy. Let’s take a look at some scenarios in which you may still utilize them:
Legacy Equipment
Older synthesizers, drum machines, sequencers, and other MIDI-compatible devices may only have MIDI ports and lack USB connectivity.
In these cases, MIDI cables are necessary for connecting and controlling these devices.
Studio Configurations
In professional recording studios, MIDI cables are often preferred for connecting MIDI keyboards, controllers, and other hardware to MIDI interfaces or MIDI-equipped audio interfaces.
This setup allows for reliable, low-latency communication between devices, especially in larger setups where USB connections may introduce latency issues.
Live Performances
Many musicians and performers still prefer using MIDI cables in live performance setups for their reliability and stability.
MIDI cables are less prone to interference or dropout compared to wireless or USB connections, making them a preferred choice for connecting MIDI controllers, keyboards, and other equipment on stage.
Customized Configurations
MIDI cables offer flexibility in creating customized setups with multiple MIDI devices, MIDI thru connections, or MIDI patch bays.
They allow for complex signal routing and control in professional audio environments where precise control and synchronization are essential.
Overall, while USB connections have become more prevalent for MIDI communication in consumer-grade devices, MIDI cables remain an integral part of many professional audio setups, offering reliability, stability, and flexibility in various applications.
- Required Reading: What is MIDI?

When it comes down to actually choosing the right interface for you, there are a few factors to consider:
How many microphone preamp inputs do you need?
In other words, how many tracks do you want to record at one time? If you’re in a band or something, you’ll need a bunch of them.
But, if you are an emcee looking to lay down some vocals on a beat, or you’re a producer who also raps and plays instruments occasionally (like me), you’ll likely only need one or 2.
That said, the flexibility of having more than one is much better, and I’ve never purchased an interface that didn’t have at least 2.
This way, you can record another instrument like an acoustic guitar, bass, or synth on Input 2 and just keep Input 1 for vocals.
With 2, you’re also able to record and sing at the same time, so keep that in mind if you’re a singer/songwriter.

I’m also finding that as I record more and plan to invest in more instruments, 2 isn’t going to cut it.
The main point is that you need to decide what you’re going to record first and then choose.
If you’re brand new to audio, I’d go with something like a Volt 2 or Scarlett 2i2, as either is an excellent entry point and will last you quite a while.
An interface like the Volt 2 also allows you to utilize MIDI cables if you so desire, so it’s pretty versatile in that sense.
Remember: you will need TWO MIDI cables to power one keyboard or synth, should you take this route. Two wires must run from the back of your synth to the back of your interface.

Finally, to the right in the above image, you’ll see the balanced TRS outputs, which allow you to connect to separate Studio Monitors like the Yamaha HS7s.
We’ll discuss this more on a separate page, so hang tight!
How much power do you need?

Another factor is power output. The Volt 2 comes with a main monitor and also has a 1/4″ (6.35mm) headphone output.
A huge benefit is being able to switch back and forth very easily between headphones and speakers without having to press any buttons or flick any switches. Just turn down the monitor volume when you’re listening with headphones and vice versa.
An interface like the Volt 2 provides plenty of power for 99% of headphones and drives even the most inefficient cans I have here (AKG K702 and HIFIMAN HE400se) with relative ease.
A quick note about direct boxes…
For recording guitar sounds as mentioned above, an alternative to actually having expensive AMPS and miking them would be to buy a direct box. The concept is simple: You run a 1/4″ instrument cable from your guitar (or bass) to the input of the direct box. Then, you would use an XLR cable from the output of the box into the microphone preamp input on the front of your audio interface.
In a nutshell, though, your direct box provides a more accurate signal transfer by electrically mimicking the input circuit from a standard guitar amplifier. In other words, it boosts the quality of your sound and takes the microphone out of the equation.
For most people…
You can easily record your electric guitar (DI) using a combo input on the front of the Volt 2.
The Bottom Line
Know exactly what your requirements are before buying. The Volt 2 is an excellent value at under $200, comes equipped with what you need (A/D converters, Mic preamps, and Phantom power), and also has MIDI capability in addition to the balanced TRS outputs for your monitors.
Also a word of advice: Make sure you aren’t trying to use a brand-new unit with old technology.
This cannot be understated. You’ll be in for a world of headaches when dealing with all the driver and connectivity issues. Take it from a person (me) who has been there before. It’s super important to make sure that you have a good core (your computer) before buying a ton of gear.
Recording Software

Your recording software is what you will use as the motive for all of this other gear. Without it, you can’t record a track, make a beat, or do much of anything! It’s the link between your ideas and the realization of those ideas.
A lot of people like to use the word DAW very loosely. Your recording software, coupled with your computer and audio interface, is what makes up your Digital Audio Workstation.
That said, there is a ton of recording software out there. Truth be told, no one program is tangibly better than another, in my opinion.
It all comes down to personal preference and what you’re comfortable using. So, try out a few and decide which is the right fit!
For me, 5 programs have served me remarkably well over the years:
- Image Line’s FL Studio
- Propellerhead’s Reason
- Steinberg’s Nuendo
- Cockos’ Reaper
- Audacity (free!)
Nowadays, I record and produce everything in FL Studio as it’s the program I’m most comfortable with, but occasionally, I’ll still use Reaper and Audacity.
If you’re a sample-based producer, I’d go with FL Studio as it’s remarkably intuitive and fun to use. The program lends itself very well to this style and proves to be remarkably versatile when it comes to mixing, EQing, chopping samples, and sequencing loops. You can also easily record vocals, guitars, and whatever else you want, as it’s a great all-in-one tool.
- Required Reading: How To Record Vocals And Audio In FL Studio 21
I have some great resources for those looking to get their feet wet with FL Studio. Just head over to the Production page.
Hardware Mixers

I’d be remiss if I didn’t talk at least a little about these, but I don’t personally use them in my projects as I’m more of a software guy when it comes to levels, sculpting, and EQ.
Still, when setting up a home studio, a hardware mixer can be a valuable centerpiece for managing audio signals from various sources.
Start by connecting your microphones, instruments, and other audio devices to the mixer’s input channels using XLR or 1/4-inch TRS cables. Adjust the input gain knobs to set the appropriate levels for each source, ensuring optimal signal-to-noise ratio.
Next, use the mixer’s EQ controls to shape the tonal characteristics of each channel, boosting or cutting frequencies as needed to achieve a balanced mix. Utilize the auxiliary sends for adding effects such as reverb or delay to individual channels or creating headphone mixes for performers.
Finally, connect the mixer’s main output to your audio interface or recording device using balanced cables and adjust the master fader to set the overall volume level.
With careful setup and routing, a hardware mixer can provide precise control and flexibility for capturing high-quality audio in your home studio setup.
With that, let’s move onward!
What You’ll Learn In The Next Section
- ✅ Microphone Basics – Understand different types of microphones and their uses.
- ✅ Large-Diaphragm Condenser Mics – Learn why they are versatile for vocals and instruments.
- ✅ Small-Diaphragm Condenser Mics – Discover their advantages for recording acoustic guitars.
- ✅ Dynamic Microphones – Know when and why to use them for loud sound sources.
- ✅ Phantom Power & Mic Sensitivity – Understand how condensers and dynamics capture sound.
- ✅ Accessories – Explore essential mic accessories like stands, shock mounts, and pop filters.