How to Create a Reverse Reverb Vocal Transition in FL Studio
Greetings mate and Welcome aboard!
Stuart Charles here, HomeStudioBasics.com helping YOU make sound decisions, so…
Ever heard a vocal that seems to swell backward into the next word or phrase?
It’s a pretty mind-blowing effect, and one that can add a sense of anticipation to an otherwise ordinary transition.
In this tutorial, I’ll show you how to create a reverse reverb vocal effect in FL Studio using Fruity Reeverb 2, a little audio manipulation, and an actual example from one of my own productions.
We’ll take a short vocal sample, create a reverb tail, reverse it, and line everything up so the sound builds naturally into the original vocal.
Let’s dive in.
What is Reverse Reverb?
Before we get into the good stuff, it’s important to understand what we’re actually doing.
Normally, reverb happens after a sound.
A vocalist says something, the sound reverberates through a simulated space, and the resulting reflections gradually fade away like Michael Jordan.
Reverse reverb essentially flips that relationship around.
Instead of hearing the reverb decay after the vocal, we hear it gradually build before the vocal begins.
The result is a swelling, almost vacuum-like effect that seems to pull and prepare the listener toward the next sound or vocal.
And while this technique is especially useful for vocals, you can apply it to all sorts of things: drums, instruments, sound effects, and even entire musical phrases.
For this example, we’re going to use a vocal sample from Talib Kweli.
The Example: Kweli’s Vocal
In one of my beats entitled “To A Lonely Boy Pt.1”, I have a section where he says:
“They ask me what I’m writin’ for.”
The phrase comes in around 20 seconds into the track, and I wanted something that would ease the listener into it rather than having the vocal appear abruptly.
The preceding section features Helga G. Pataki privately professing her love for Arnold, culminating in her shouting “LOVE!” with the reverb from that sample lingering in the background.
The idea was to create a transition between those 2 moments. Helga’s reverb gradually fades away/decays while a reversed reverb swell introduces Talib’s vocal.
Here’s how to do it:
Step 1: Isolate the Beginning Of your Vocal
Open FL Studio and locate the sample you want to work with.
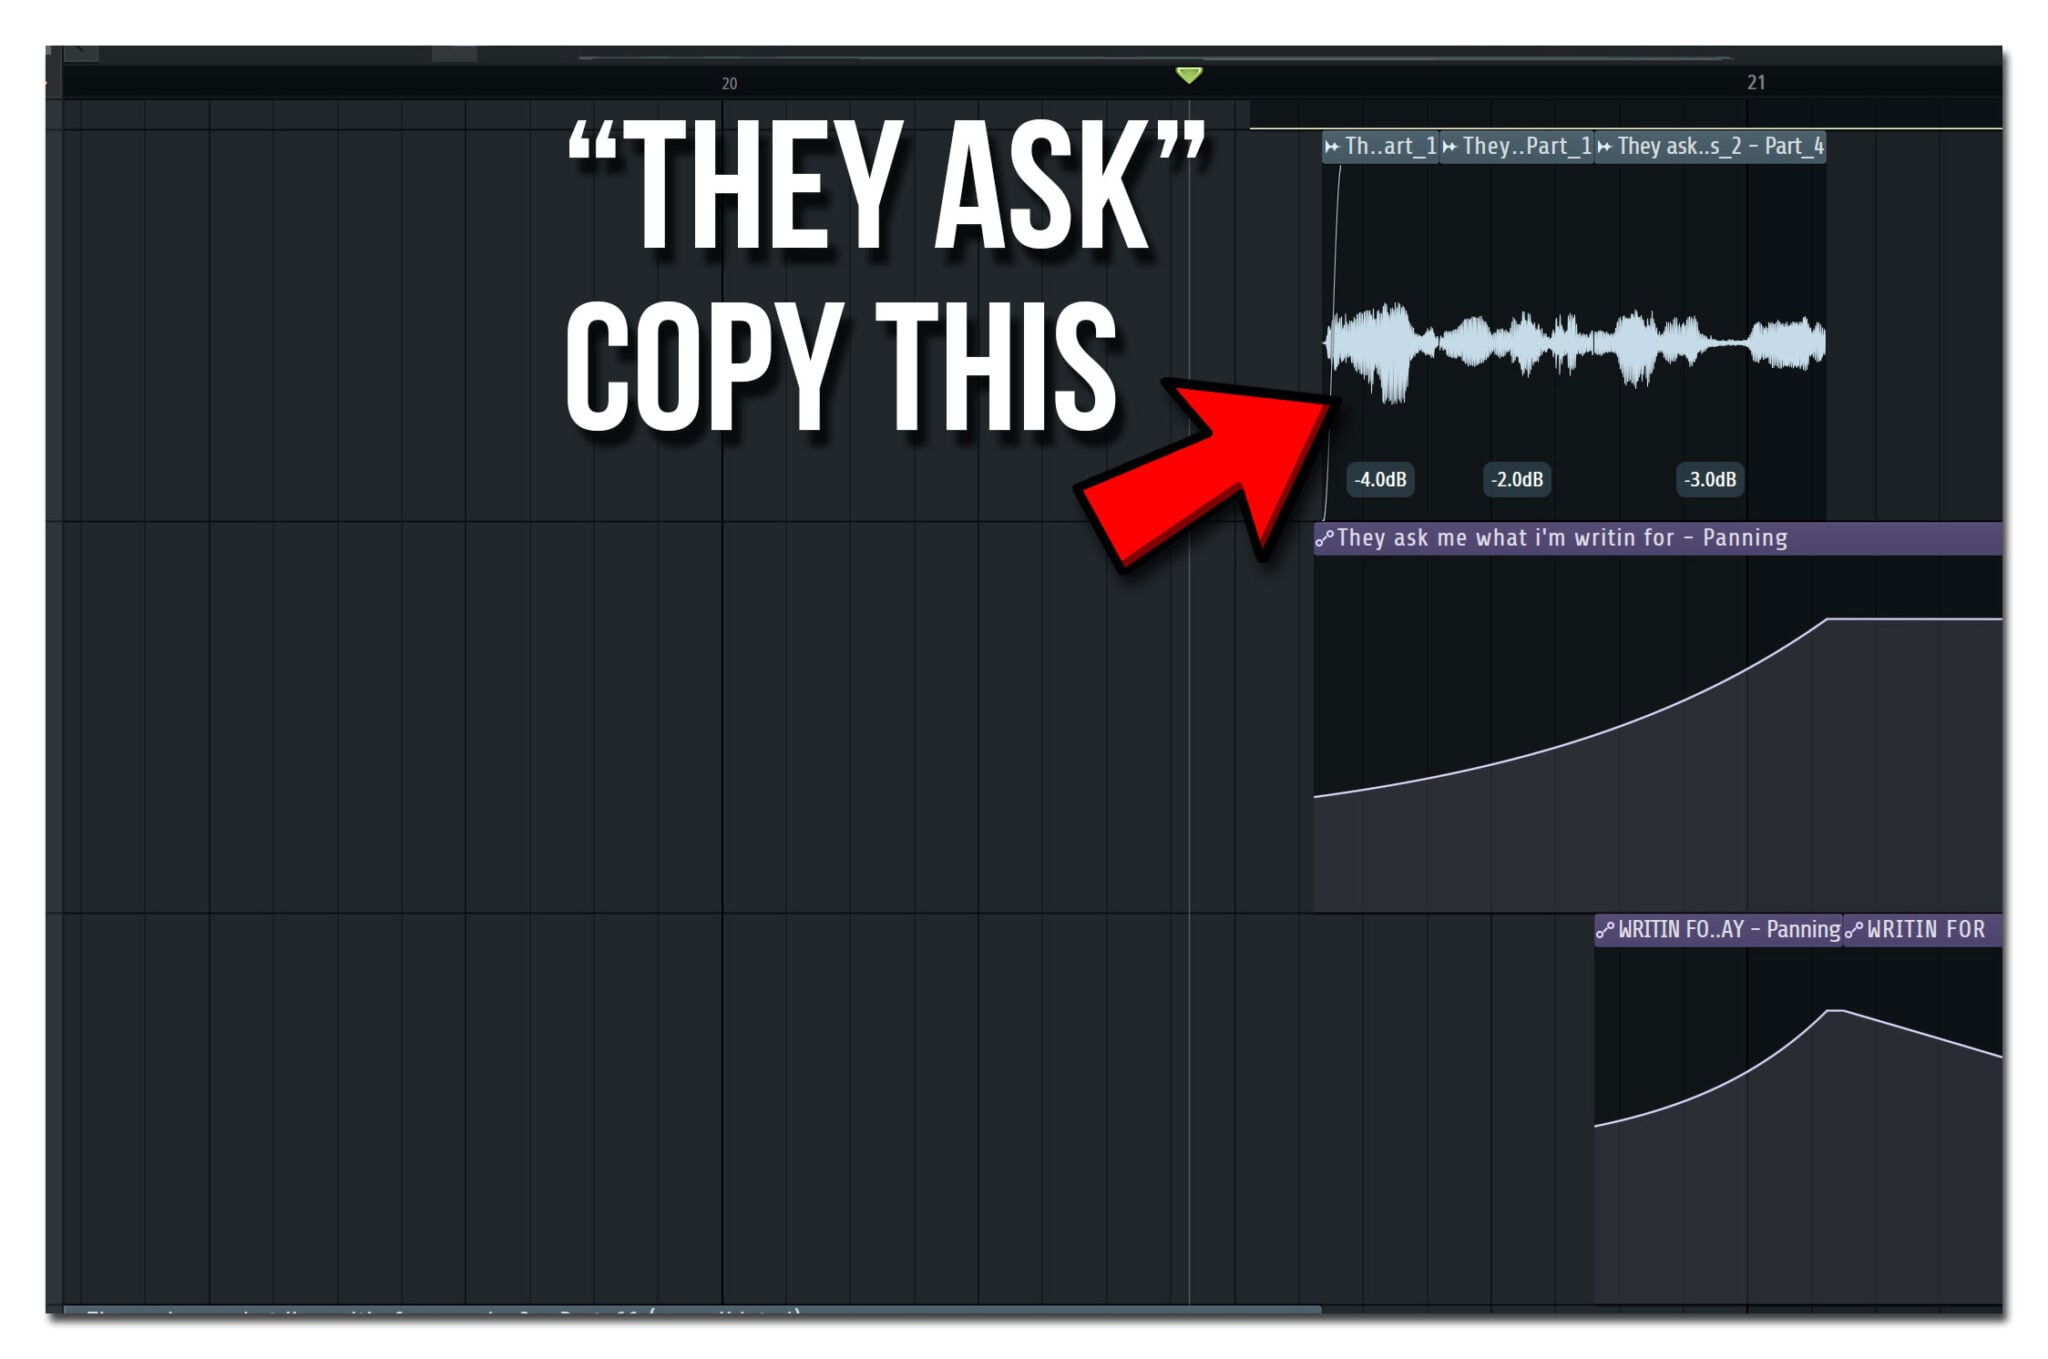
In my case, it’s Talib’s opening words: “They ask.”
You don’t need to process the entire vocal phrase. In fact, isolating just the beginning generally makes the effect easier to control.
- Place your original vocal sample in the playlist.
- Use the Slice tool (c) to separate the opening word or syllable.
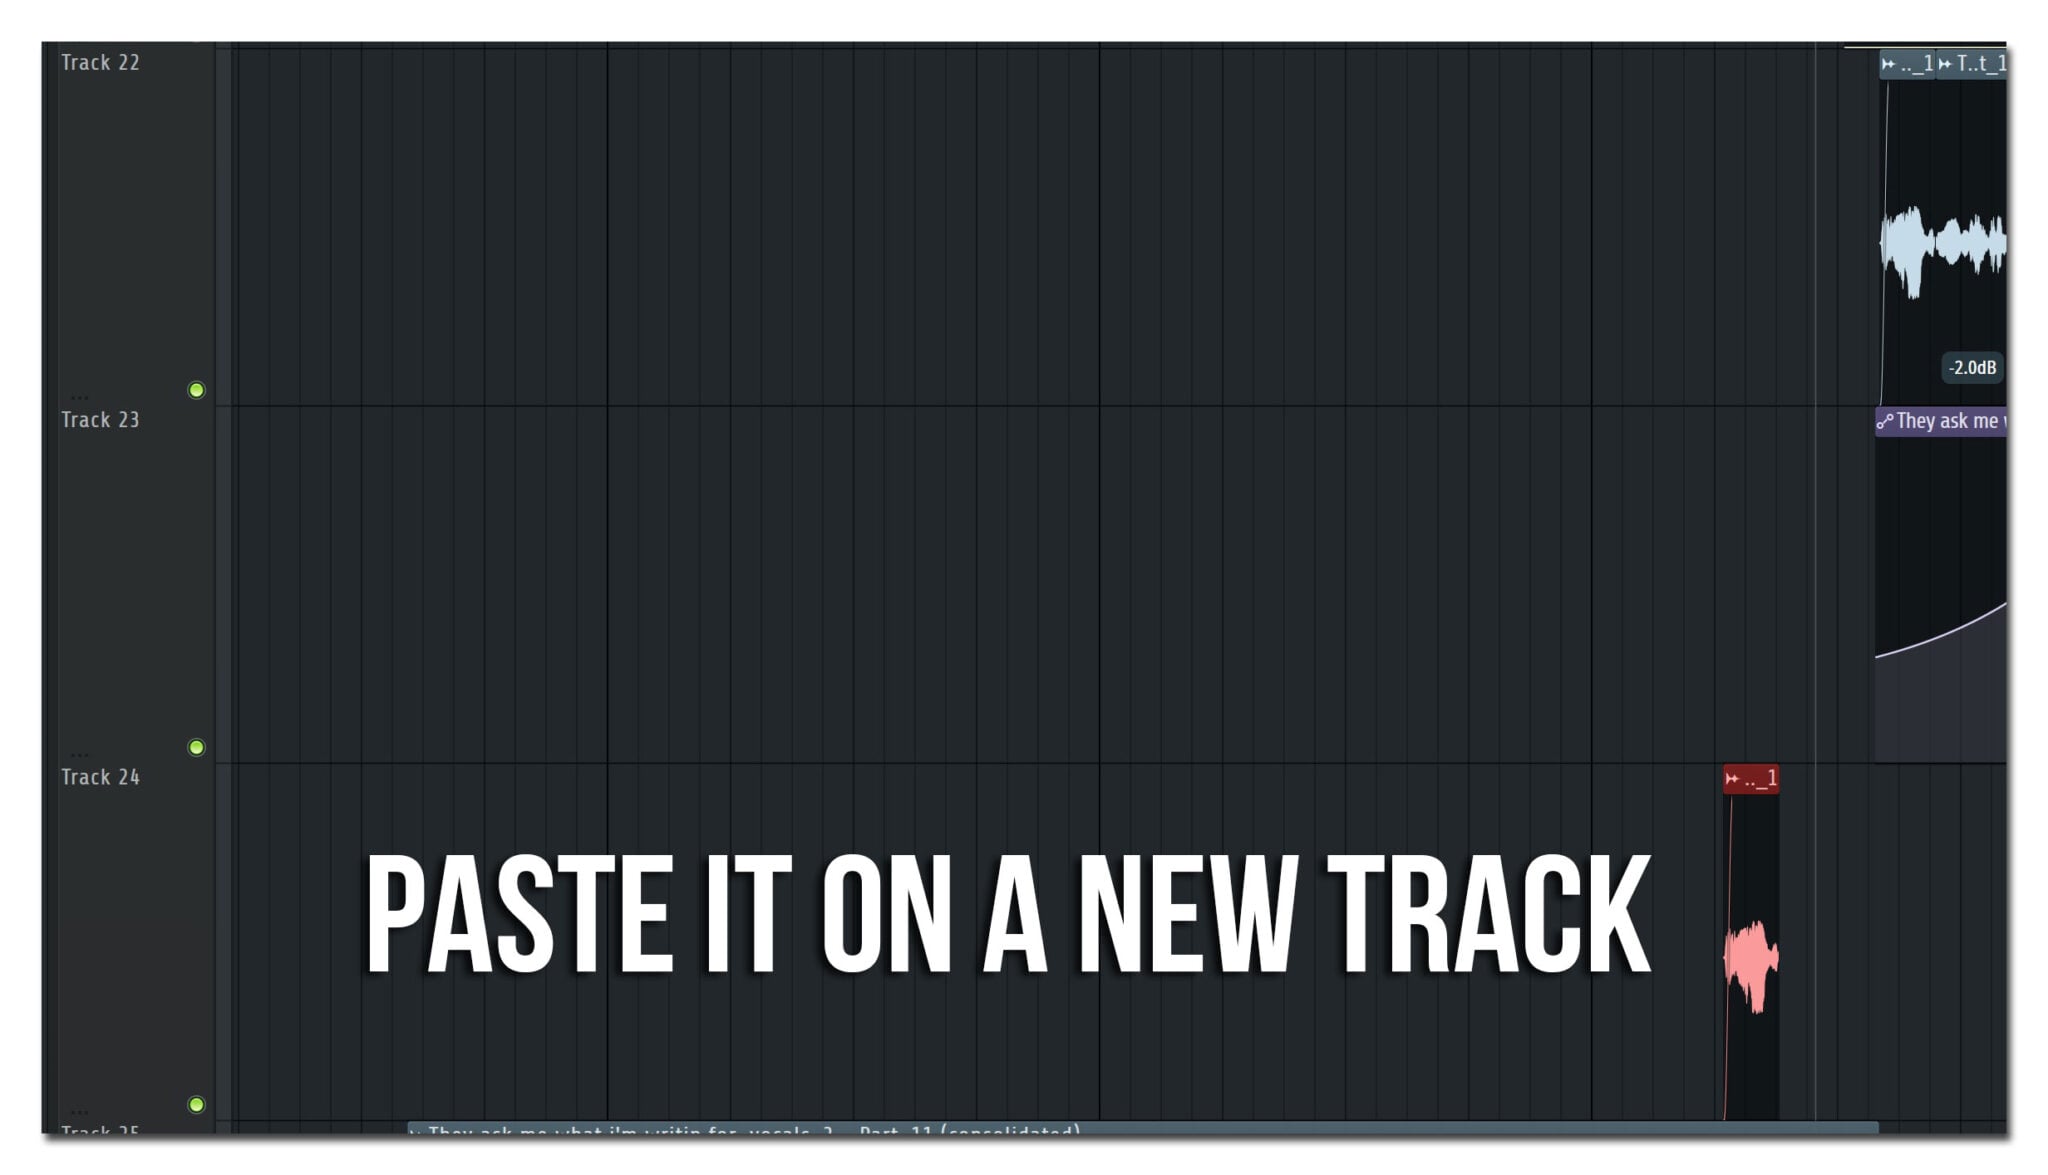
- Make a copy of that short section
- Move the copy to a separate playlist track so you can process it independently.
Keep the original vocal intact since we’ll need it later.
The copied section is simply our source material for creating the reversed reverb.
Step 2: Add Fruity Reverb 2
Next, we need to create a reverb tail from our copied vocal.
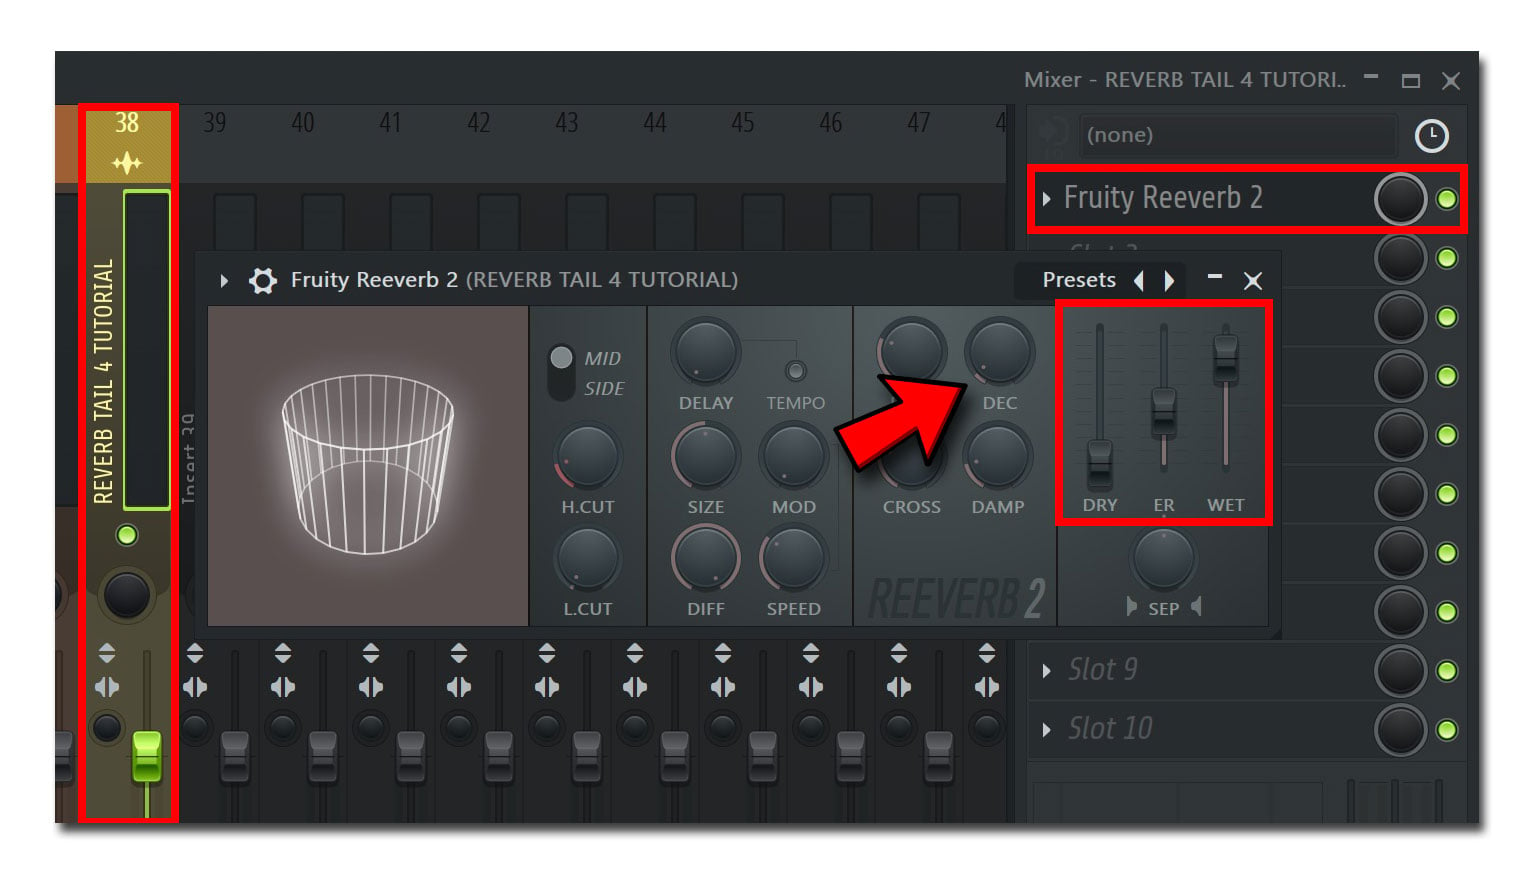
First, assign the copied sample to its own Mixer insert. To do this, select it, hit F9 to open the mixer, choose an insert, and then press ctrl + L.
Now load Fruity Reeverb 2 onto the insert. You can also rename the insert if you want. Right-click > Rename, color, and icon, or just hit F2.
But here’s where things get interesting.
We don’t actually want to hear the original vocal in this processed version.
We only want its reverb.
To accomplish that, start with these settings:
Dry: 0%
Wet: 100%
Decay: Approx. 2-4 seconds
With Dry at 0%, the original vocal is removed from the processed output.
And with Wet at 100%, we’re hearing the reverb itself.
The Decay control determines how long that reverb lingers.
A longer decay creates a more extended swell once we reverse it, while a shorter decay produces a quicker transition.
These are starting points, not mandatory settings. Experiment until you get a tail that works with your song.
Step 3: Render the Reverb Tail
Now that we’ve created our reverb, we need to turn it into an audio file.
Why?
Because we’re going to reverse the entire reverb tail, and doing that is much easier once it’s been rendered into a waveform.
In the Playlist:
Make sure the copied vocal is playing through the Mixer insert containing Fruity Reeverb 2.
Select a time range that includes the copied vocal and enough additional space for the reverb to finish decaying.
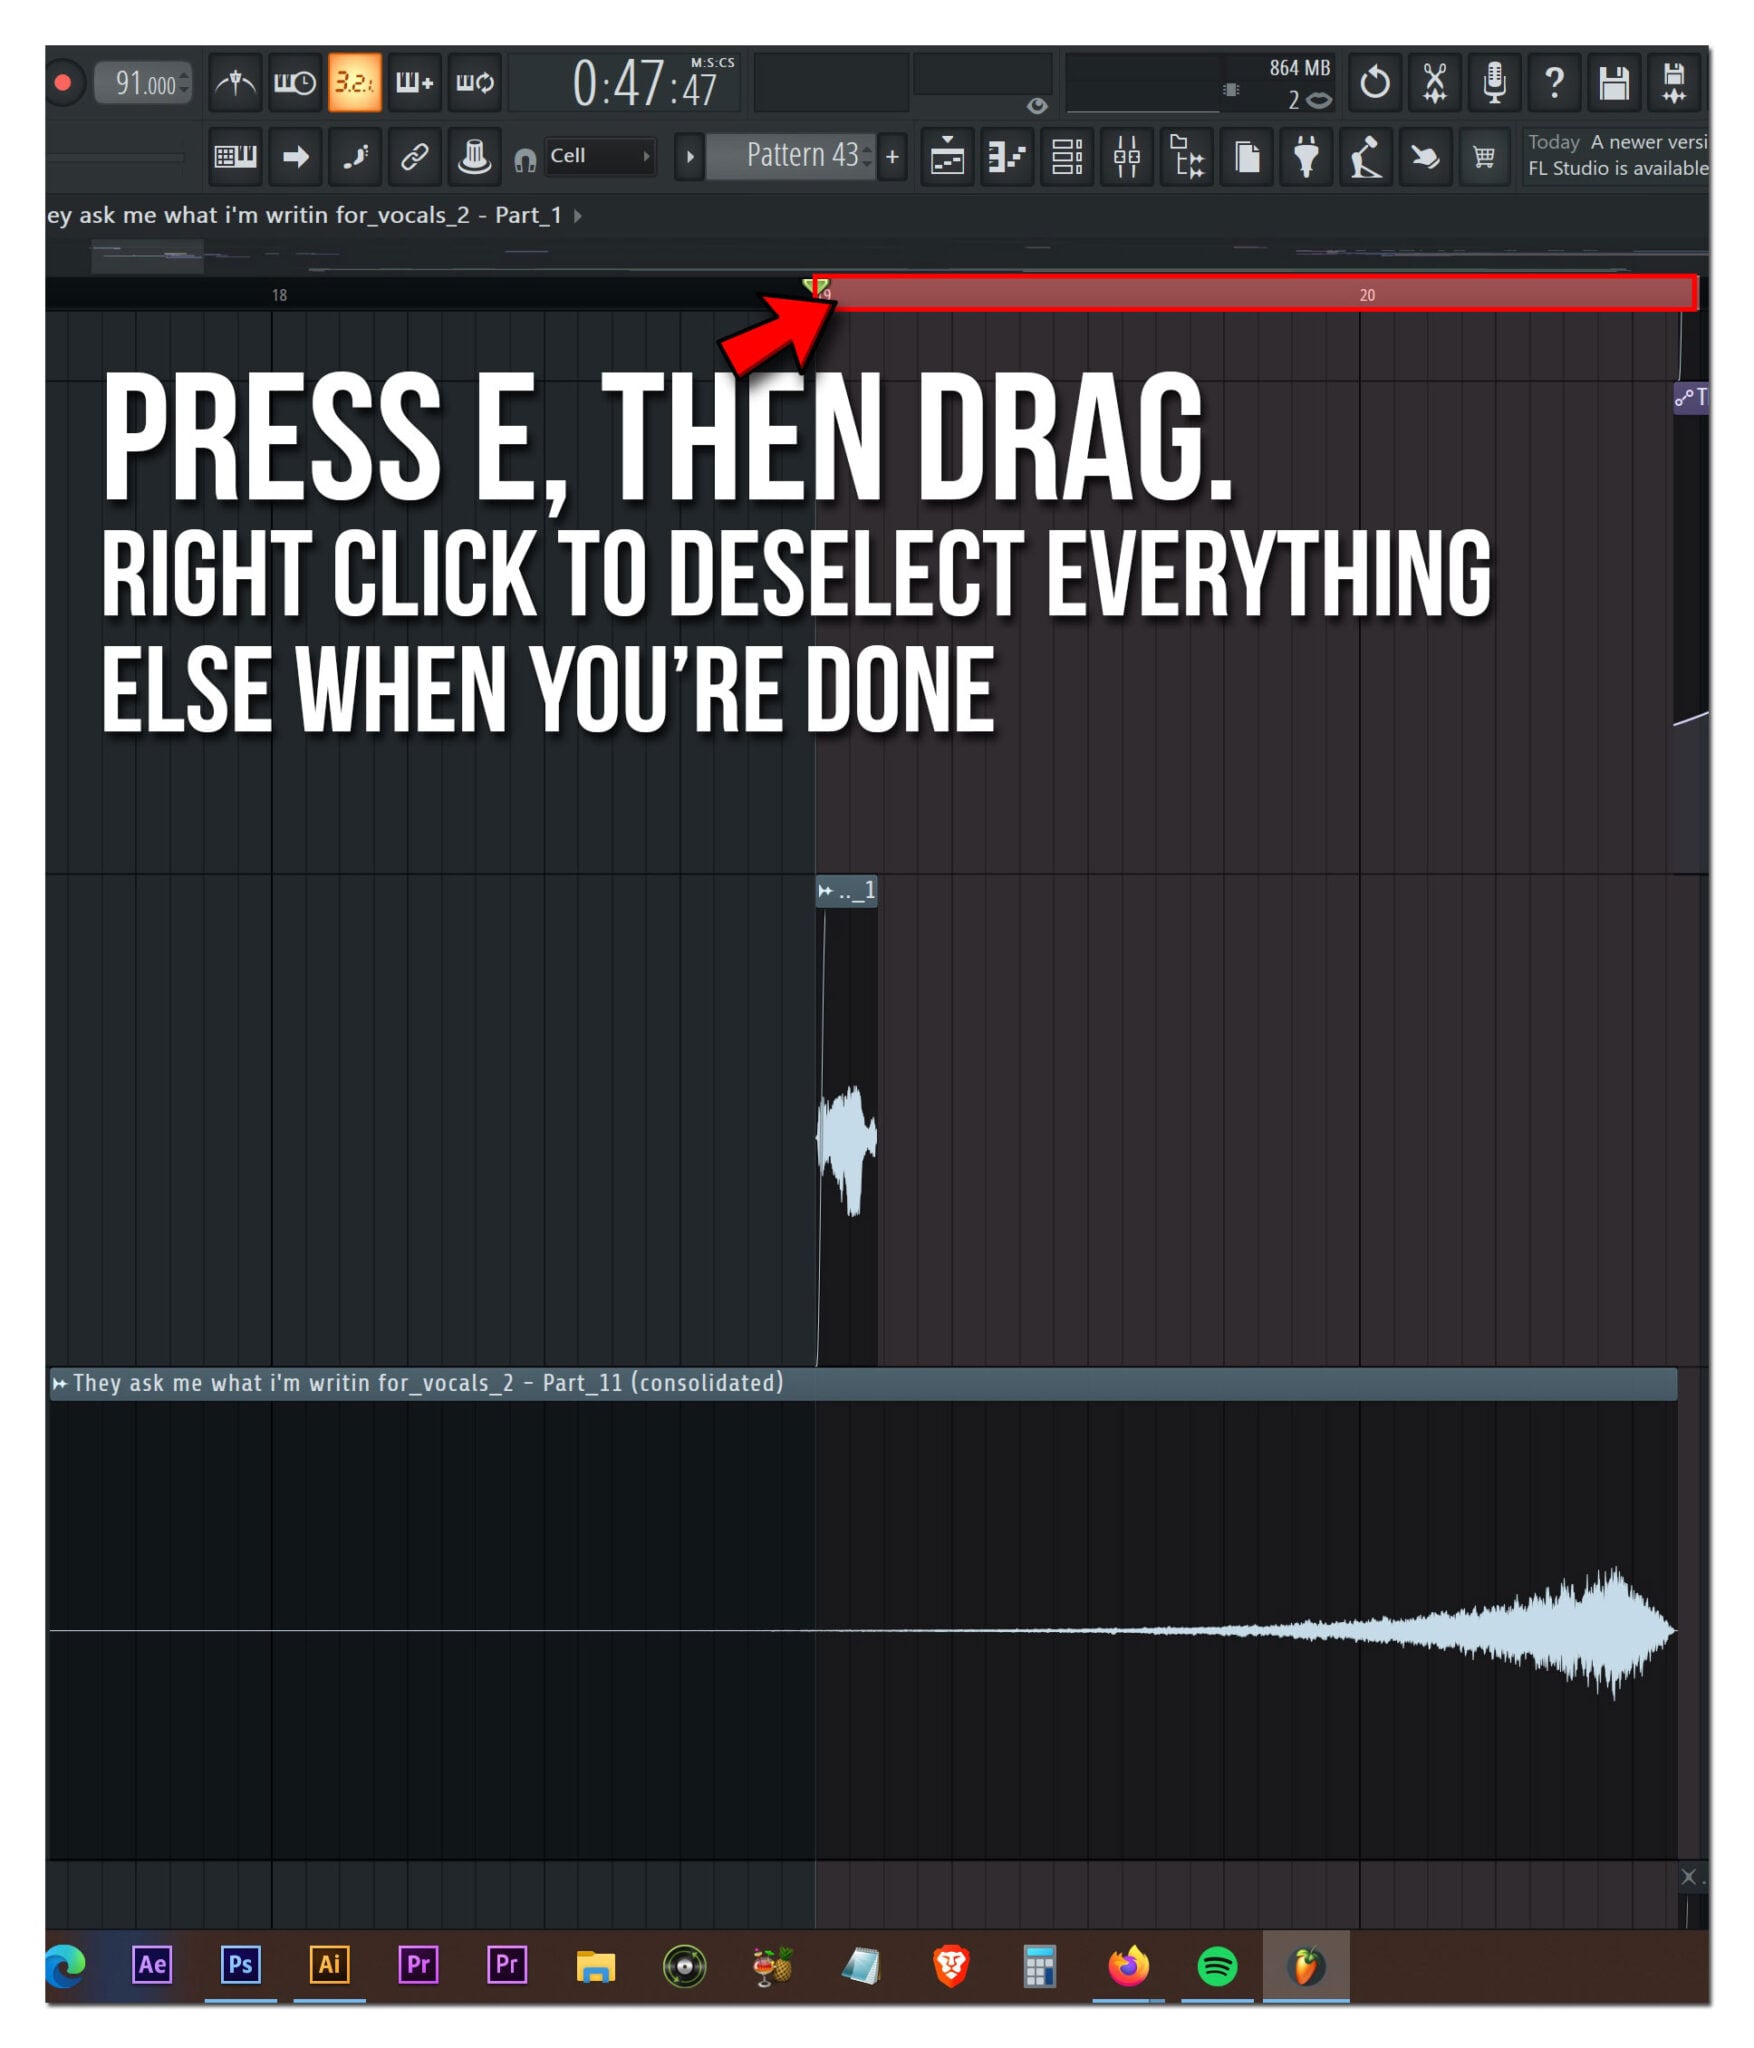
To do this, press E on your keyboard, make sure you’re in that small space at the top of the playlist, click and drag until you’re satisfied with the selection.
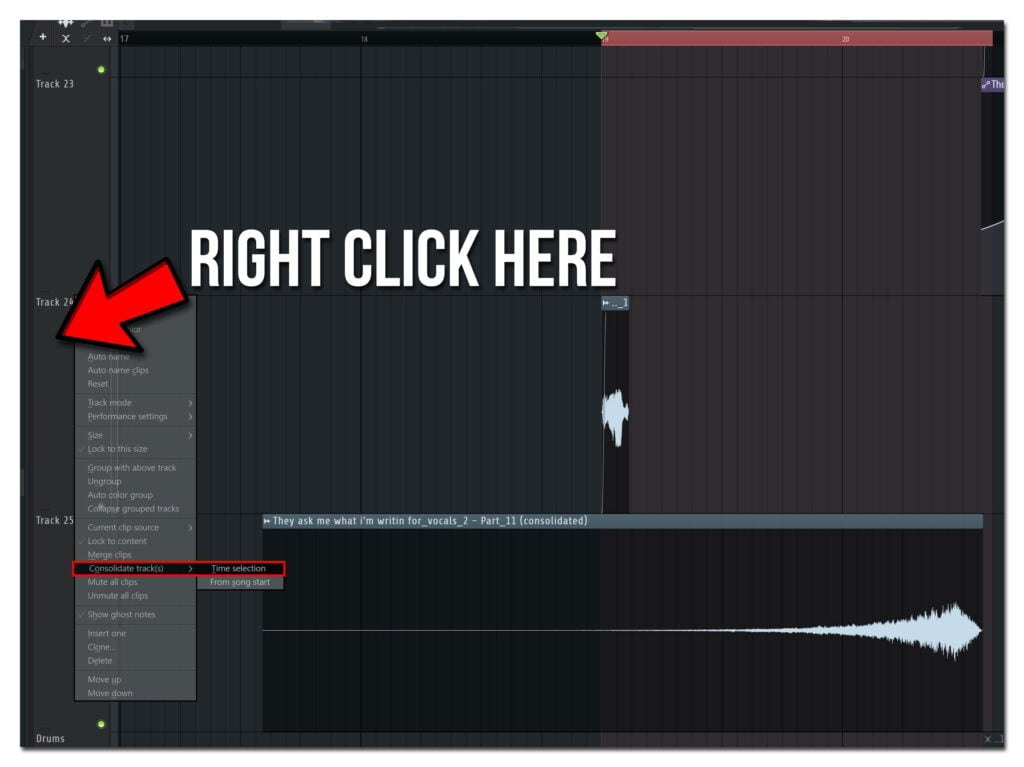
Use the Playlist’s Consolidate this track > Time Selection command to render the processed audio.
The important thing is that the resulting audio contains the full reverb decay, not just the original word.
If the reverb gets cut off, extend your selected time range and render it again.
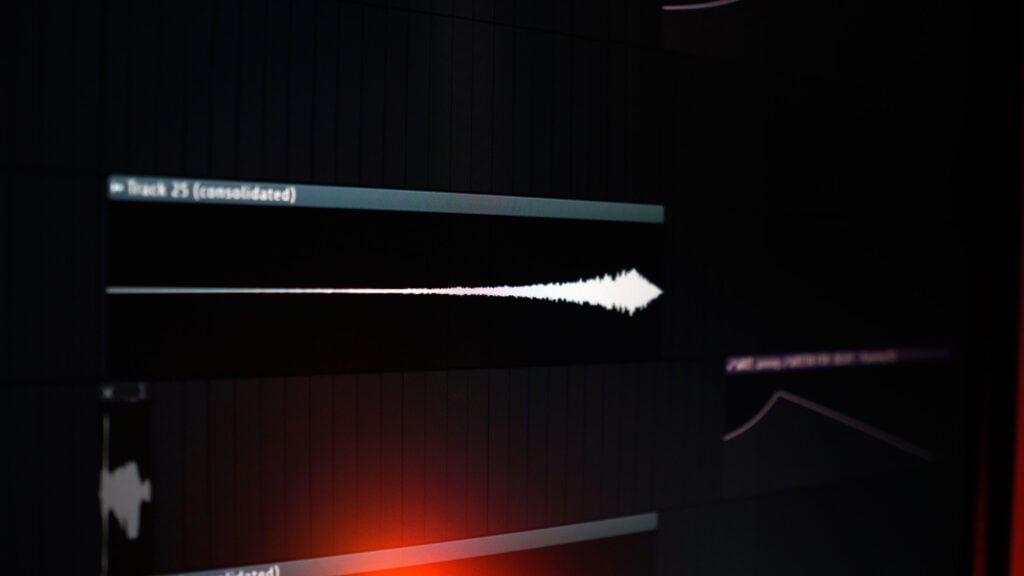
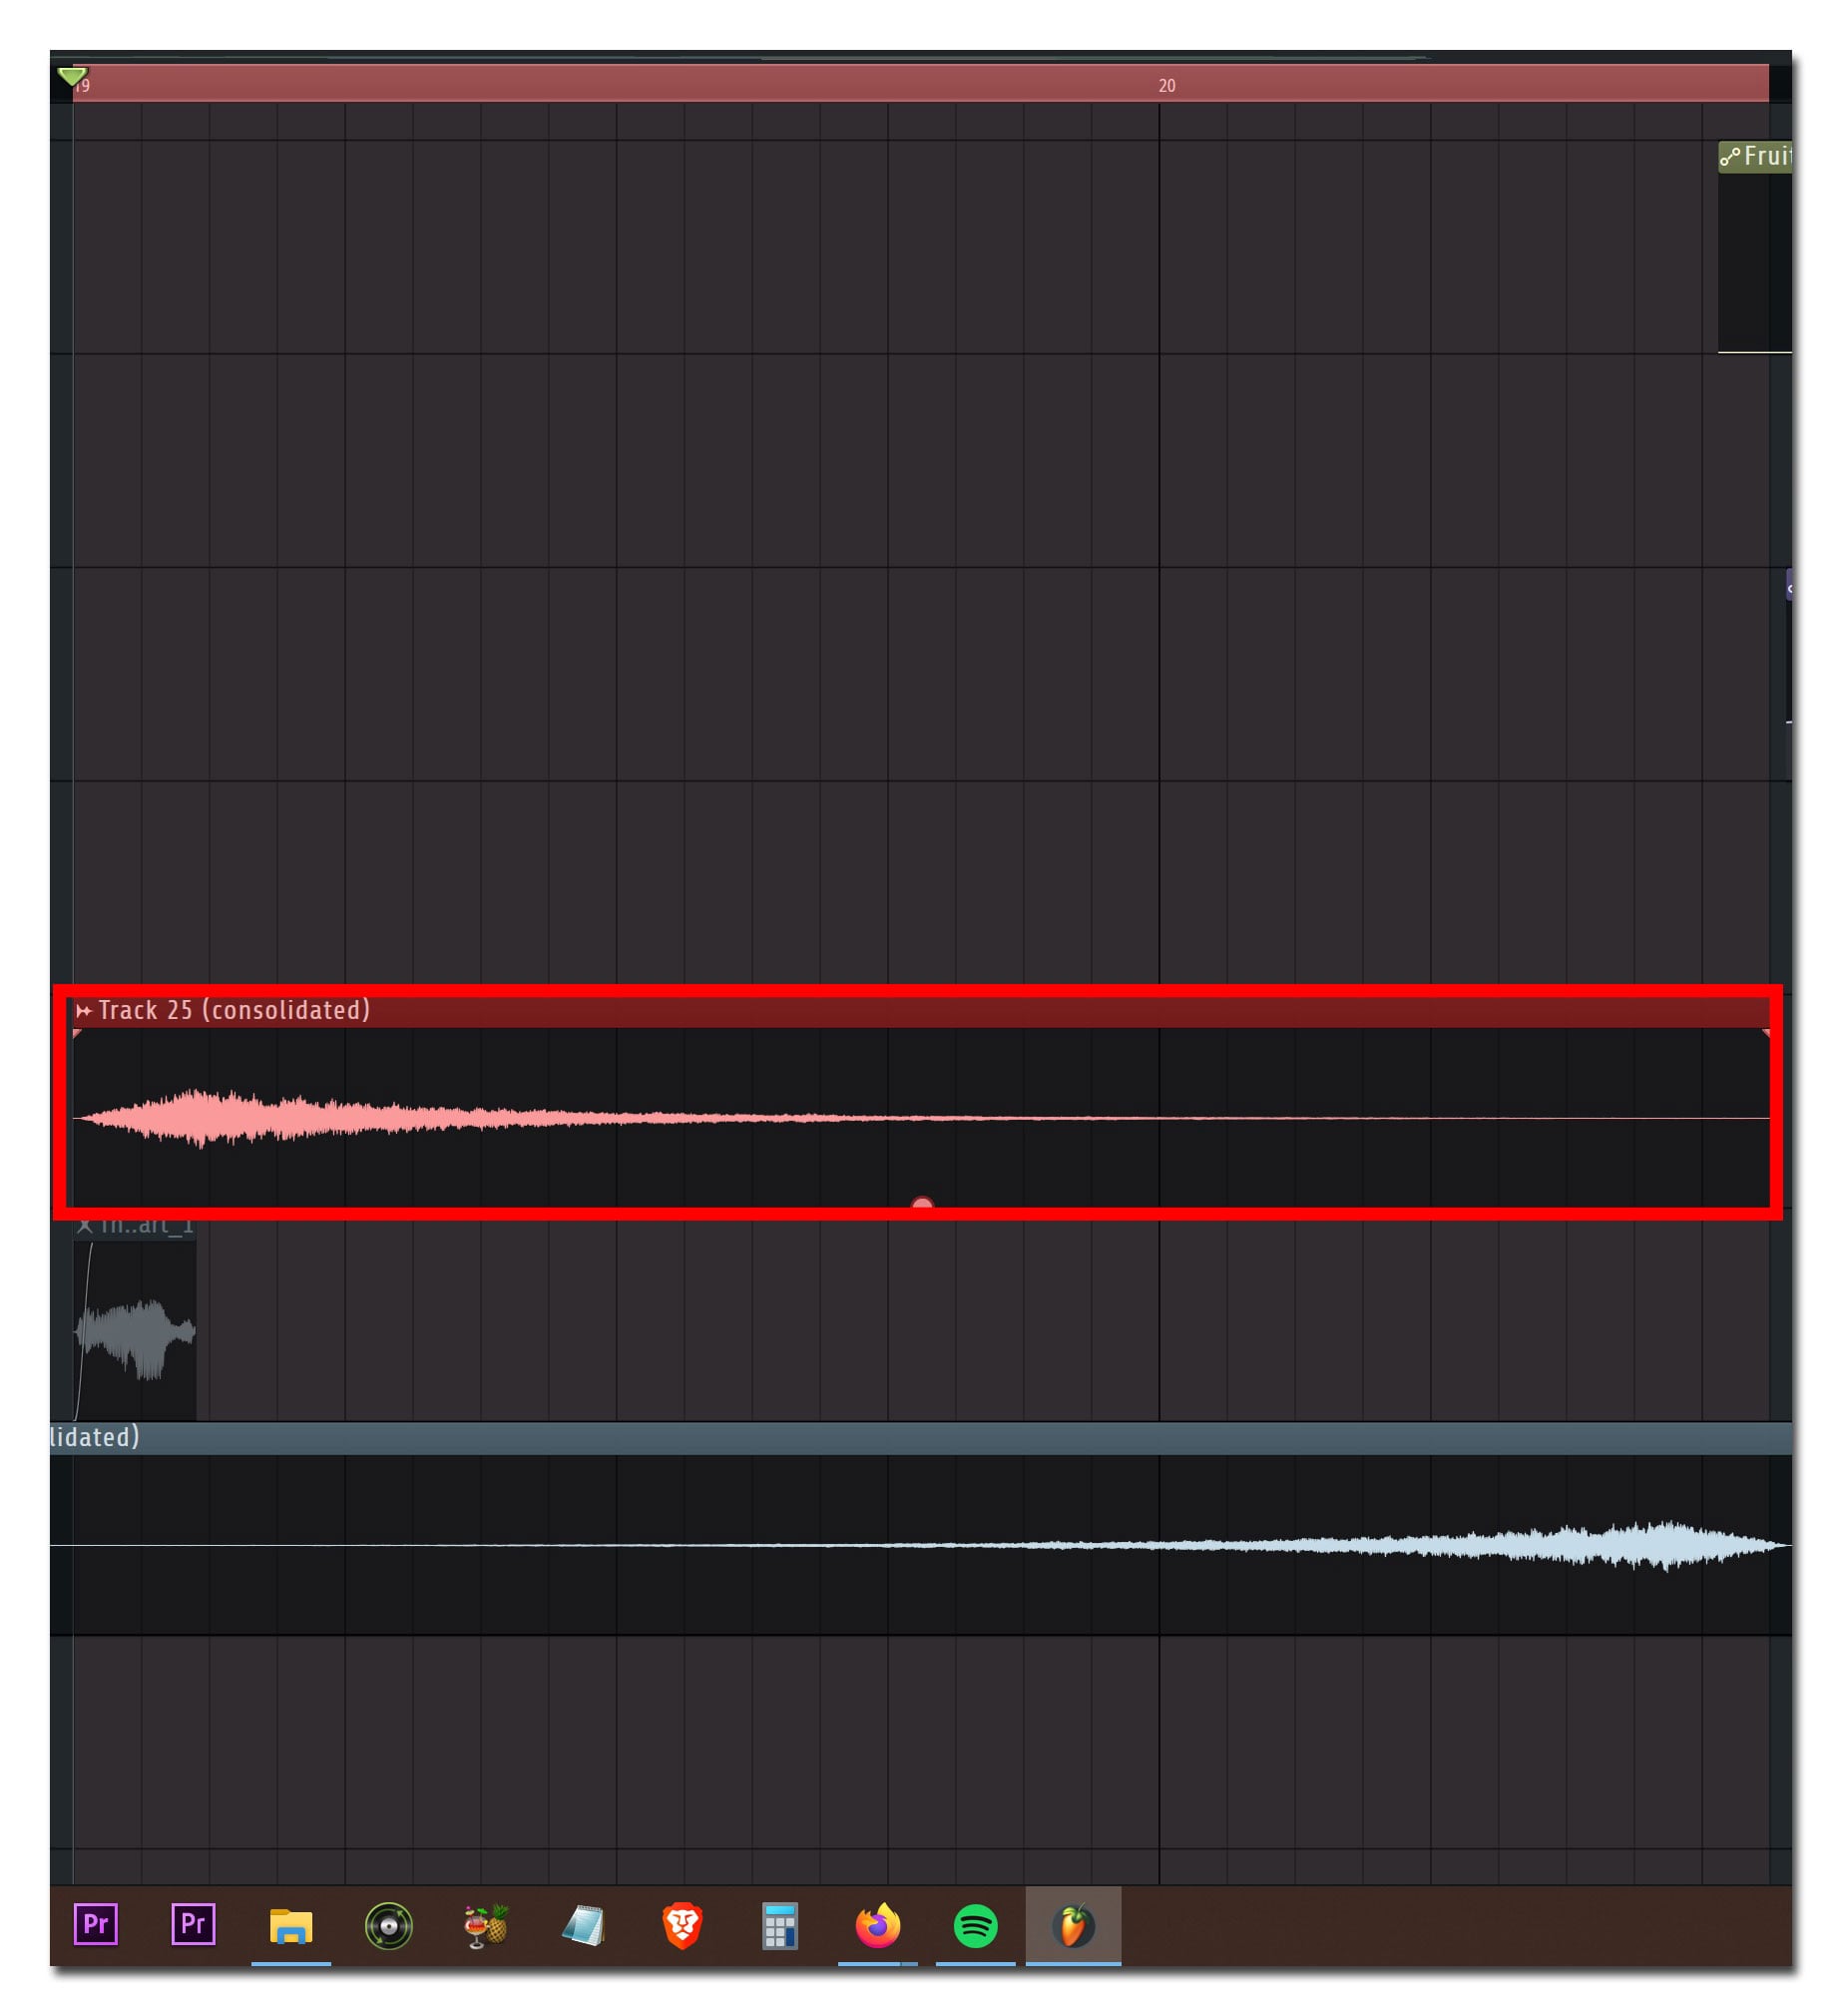
Once you’re finished, you should have a new audio clip containing the vocal’s reverb:
One Important Detail
Before moving on, listen to the rendered clip by itself.
You should hear the reverb generated from the vocal, without a prominent dry version of the word.
If you still hear the original vocal clearly, double-check the Dry and Wet settings, the Mixer routing, and any other active effects.
We want the reverb tail to do the heavy lifting here.
Step 4: Reverse the Rendered Audio
This is where the magic happens.
Double-click your newly rendered audio clip to open its Channel Settings.
Under Precomputed Effects, enable Reverse.
FL Studio will reverse the audio, causing the reverb’s natural decay to play backward.
Instead of starting loud and gradually fading away, the sound now starts quietly and builds in intensity.
Pretty neat, right?
Note: Seen towards the bottom is the one I had done previously.
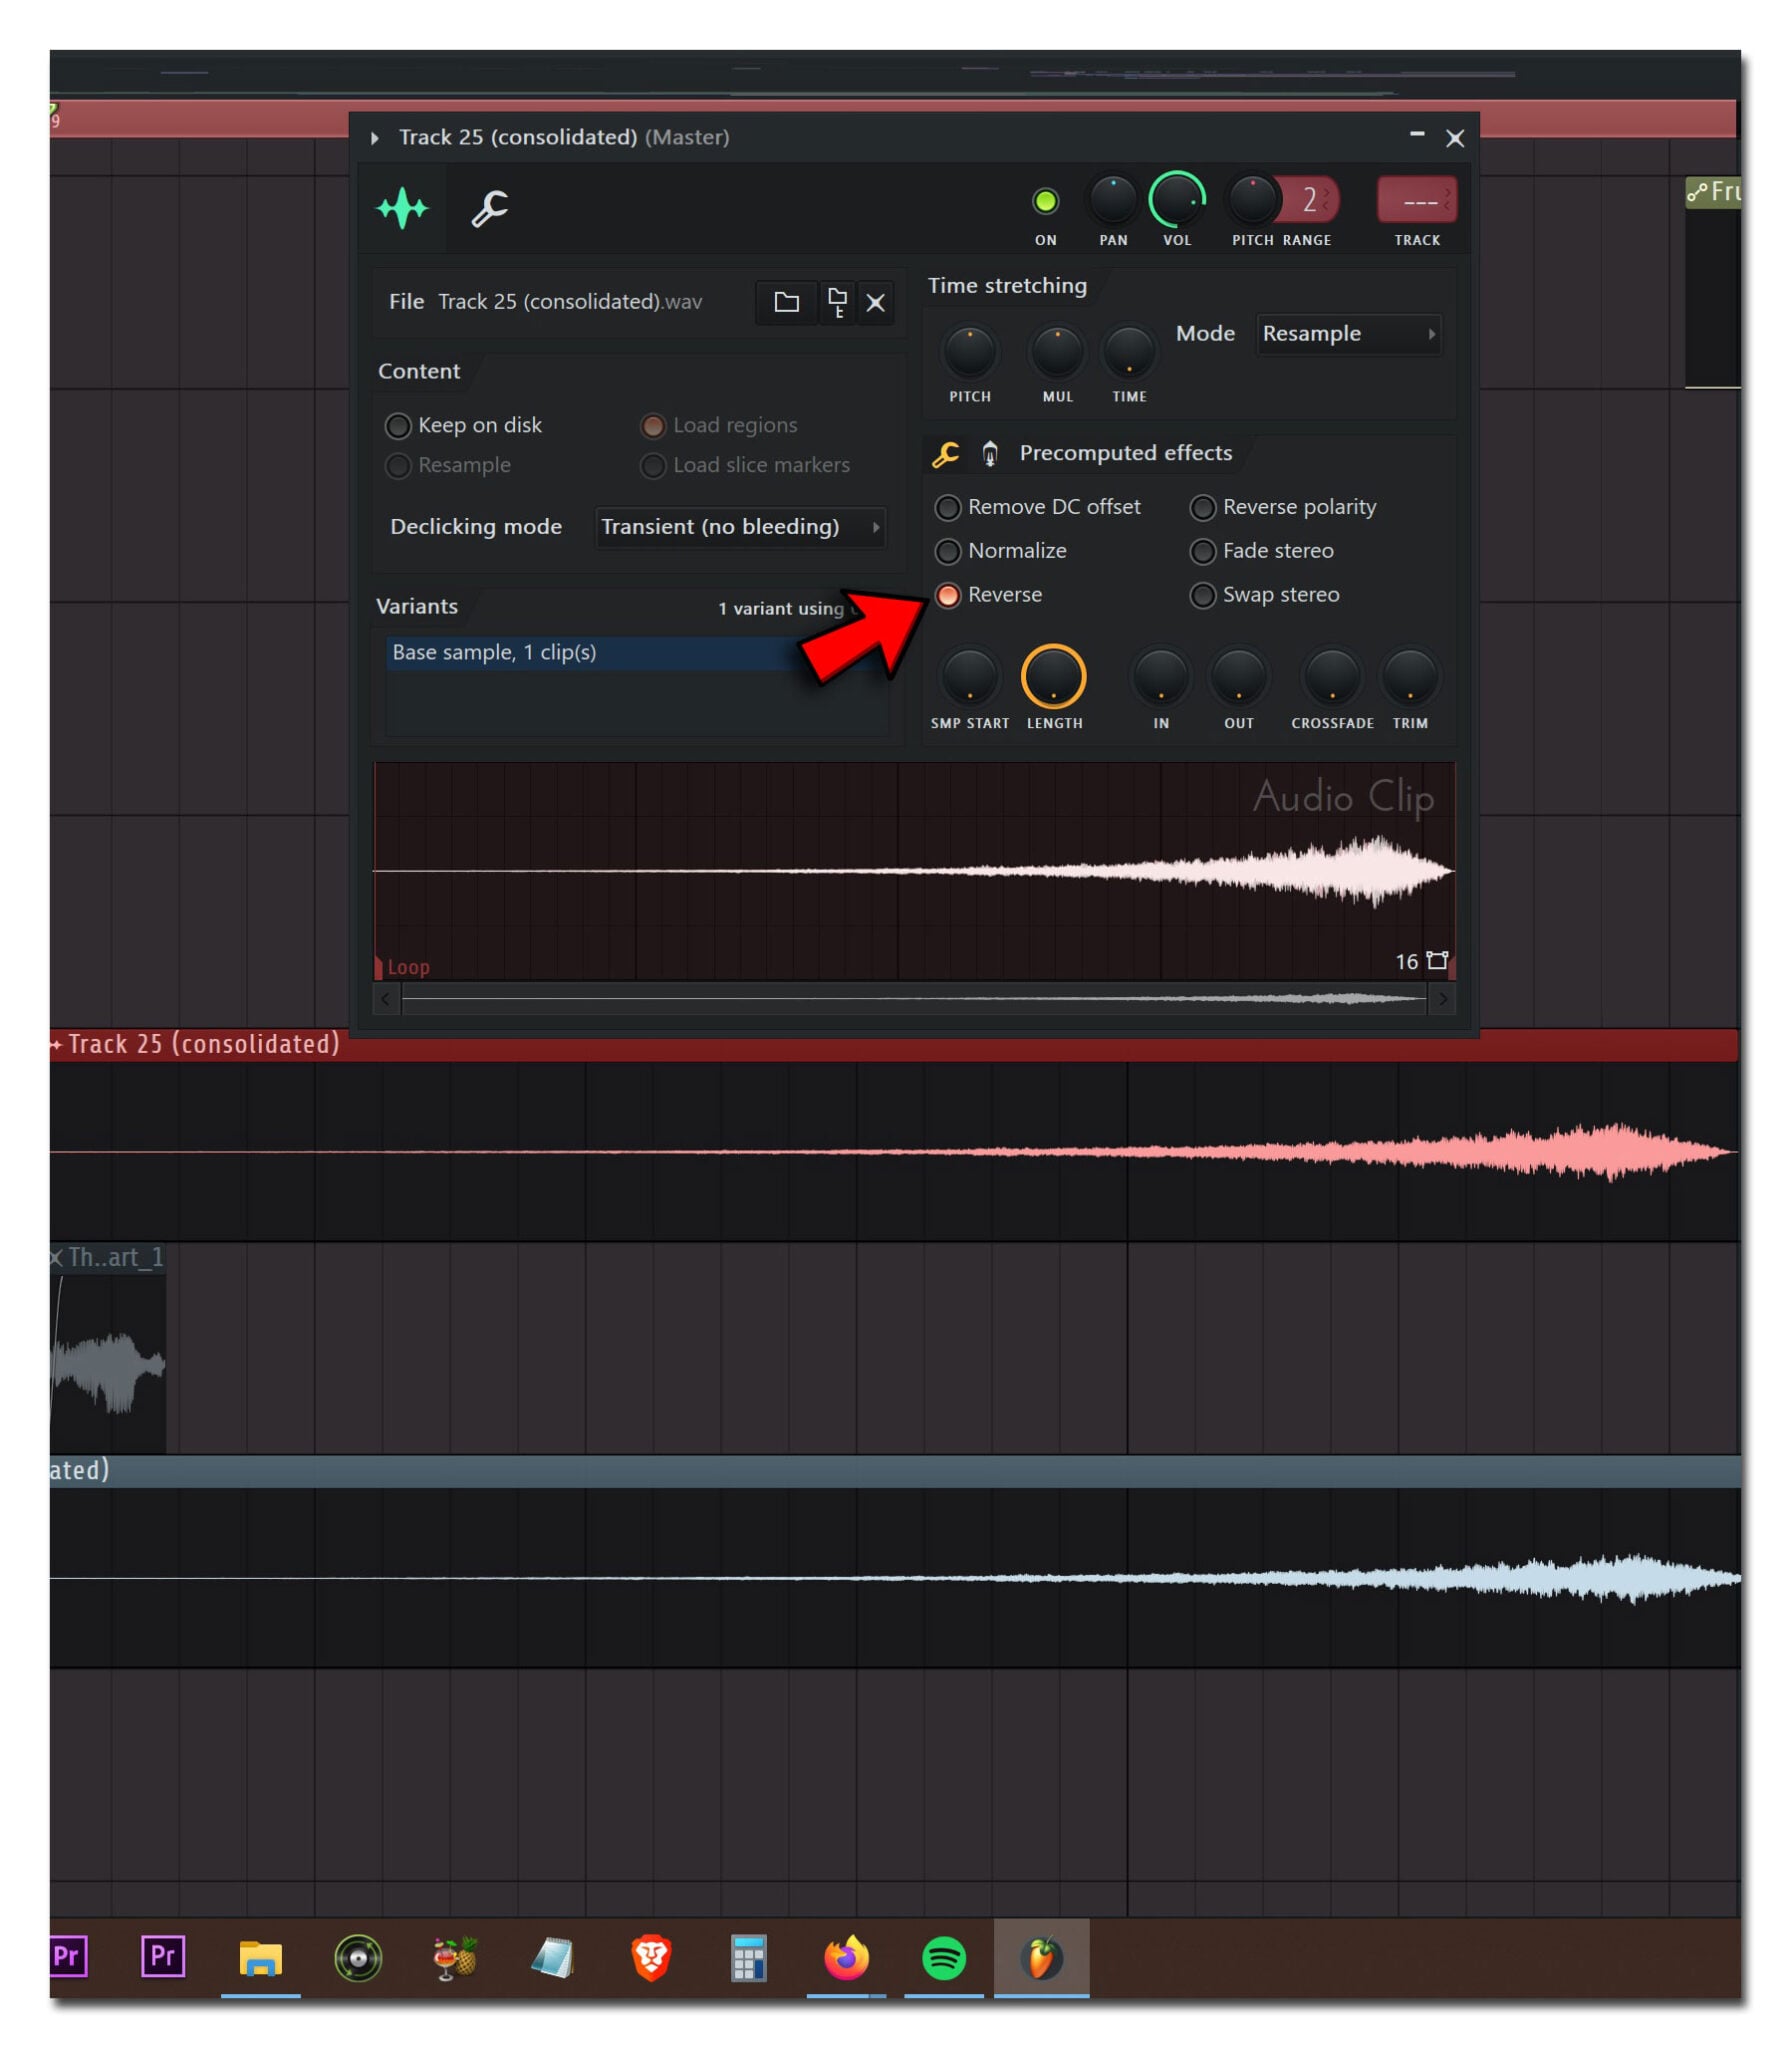
Play the clip by itself.
You should hear a gradual swelling sound that ends with the more recognizable reverb from the original vocal.
That’s our reverse reverb effect. From here, you can adjust the volume by hovering over it until you see the middle gain adjuster.
Step 5: Align the Reversed Reverb With the Original Vocal
Now we need to position everything correctly.
Return to the Playlist and locate the original, unprocessed Talib vocal.
Remember, we kept that intact earlier.
Move the reversed reverb clip so that its ending lines up with the beginning of the original word “They.”
In other words:
- The reversed reverb plays first.
- Its volume gradually increases.
- The swell reaches its endpoint.
- The original vocal begins.
The listener hears the sound building toward the word before Talib actually says it.
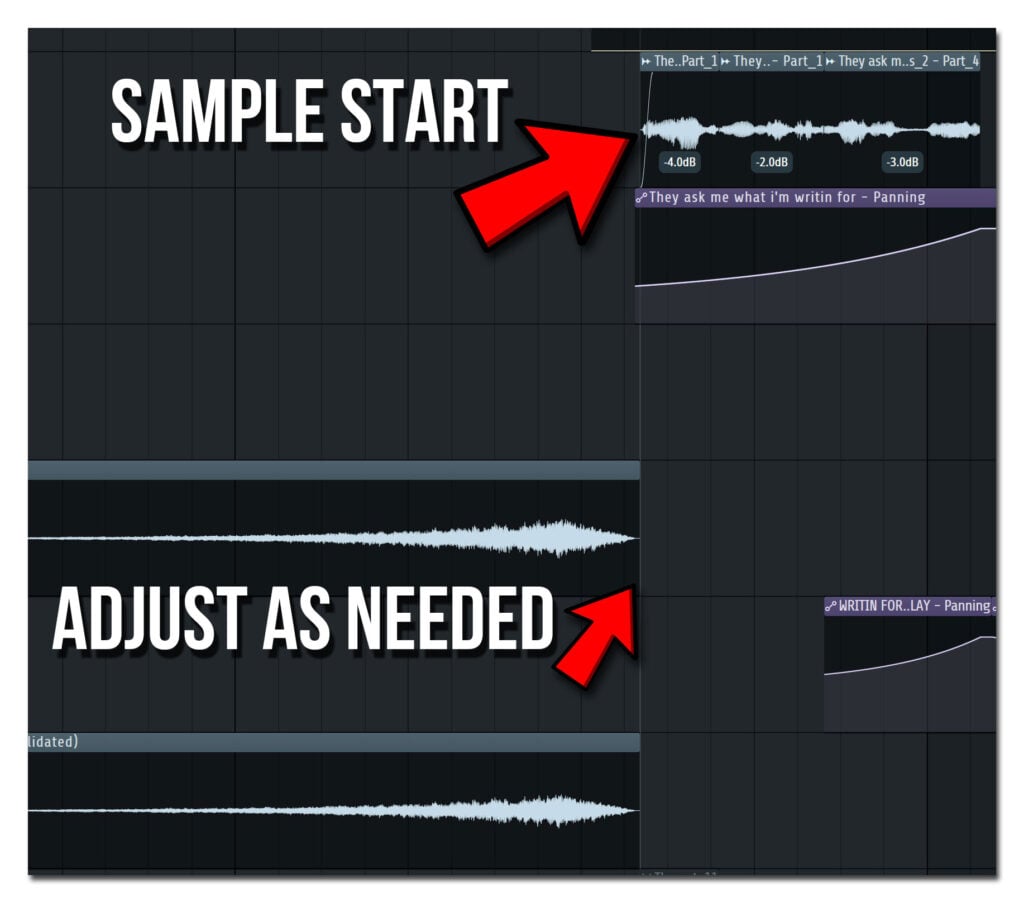
Adjusting the Timing
Don’t be surprised if you need to move things around a little.
Depending on how long your reverb tail is, the transition might feel too drawn out or too abrupt.
You can shorten the reversed clip, adjust its starting position, or go back and create a different reverb decay.
The goal is to make the transition feel natural within the rhythm of the song.
You also don’t necessarily need the reversed clip to end at the exact moment the dry vocal begins.
A little overlap can sometimes make the transition feel smoother.
Experiment with both approaches and see what works.
Step 6: Blend the Reverse Reverb Into the Mix
At this point, the effect is technically finished.
But that doesn’t necessarily mean it sounds right in context.
One thing I’ve learned from experimenting with effects in FL Studio is that something can sound fantastic in isolation and completely different once the rest of the instruments come back in.
Reverse reverb is no exception.
Start by adjusting the volume of your reversed audio clip.
You want the swell to be noticeable without overpowering the vocal it’s introducing.
If the effect sounds too prominent, reduce its level.
If it gets buried beneath the instruments, bring it up slightly.
You can also experiment with EQ to remove frequencies that interfere with the original vocal.
For example, reducing some low-frequency buildup can help prevent the reverb from muddying the transition.
The key is to remember that the reversed reverb is supporting the vocal, not replacing it.
Step 7: Hear the Finished Transition
Now, let’s return to the original example.
As mentioned earlier, the section preceding Talib’s vocal features Helga shouting “LOVE!”
That sample already has a lingering reverb effect, which creates a sense of space as the phrase comes to an end.
Rather than letting that reverb fade into silence, I wanted the next vocal to emerge from the atmosphere it created.
That’s where our reverse reverb comes in.
As Helga’s reverb hangs in the background, Talib’s reversed vocal reverb gradually begins to swell.
The first sound is dying away while the second is building.
And when Talib finally says, “They ask me what I’m writin’ for,” the transition feels more connected than it would with a simple hard cut.
It’s a relatively small production detail, but those are often the things that make a track feel more deliberate.
Other Ways to Use Reverse Reverb
While I used this technique to introduce a vocal sample, there are plenty of other applications.
You could create a swell leading into a snare hit, reverse the reverb from a piano chord, or use the effect to introduce a new section of a song.
It’s also worth experimenting with different reverb lengths.
A short reverse reverb might work well as a subtle transition between words, while a longer one can create a more dramatic buildup before a chorus or instrumental change.
And because you’re working with rendered audio, you can manipulate the reversed clip further using volume automation, filtering, or other effects.
There’s quite a bit of room for experimentation here.
Final Thoughts
And there you have it!
Creating reverse reverb in FL Studio is fairly straightforward once you understand the process.
We’re essentially taking a normal reverb tail, rendering it to audio, reversing it, and positioning the resulting swell before the original sound.
But the real fun comes from experimenting with how that effect interacts with everything around it.
In my case, it helped connect two completely different vocal samples into a more cohesive transition.
Give it a try in one of your own projects, play around with the timing and decay, and see what you come up with.
Well, that’s about it for today, my friend. I hope you enjoyed this article on How to Create a Reverse Reverb Vocal Transition in FL Studio and came away with some valuable insight.
Questions? Comments? Requests? Did I miss the mark on something? Please let me know down below or Contact me!!
If you love what I do here and want to support the blog and channel in a more personal way, check me out on Patreon and discover all the value I have to offer you.
Have you had any experience mixing with headphones? Are there any headphones you would add or take away? I would love to hear your thoughts. Until next time…
All the best and God bless,

-Stu
Can’t decide which headphones to purchase? Interested in a complete buyers guide outlining over 40 of the best options on the market? Click on over to the best audiophile headphones to learn more!!
Be sure to also check out my Reviews and Resources page for more helpful and informative articles!