AKAI MPD18 Review: Ancient History?
Greetings mate and Welcome aboard!
Stuart Charles here, HomeStudioBasics.com helping YOU make sound decisions, so…
It’s been 10 years since I owned the AKAI MPD18, and I wanted to revisit this article to re-review it + and see if it’s still worth a purchase today.
We’ll discuss its build, features, ease of use, and more. By the time you’re finished reading this brief rundown, you’ll know if it’s right for you.
If it isn’t, I’ll point you in the direction of something that is.
Deal?
Cool.
Let’s dive in!
When I first started making beats, I bought a Korg padKONTROL and enjoyed it for a long time. A couple of years into my journey, I decided that I wanted to try an AKAI product and see what all the fuss was about. At the time, everyone was raving about their products but they are still wildly popular today!
Since the price of the MPD18 looked reasonable, I took the plunge.
Was it a mistake?
Let’s find out.
What Is It?

First off, it’s helpful to clarify what we’re working with. The MPD18 is what’s known as a MIDI Controller. This means you assign samples, VSTs, etc. into the pad and sequence songs inside a program like FL Studio.
This is not to be confused with a MIDI Keyboard. Because the MPD18 is just a controller, it doesn’t have any instruments or sounds built-in. Think of it as a skeleton or shell; it only plays stuff that you program it to play.
- Required Reading: What is MIDI?
Build & Features
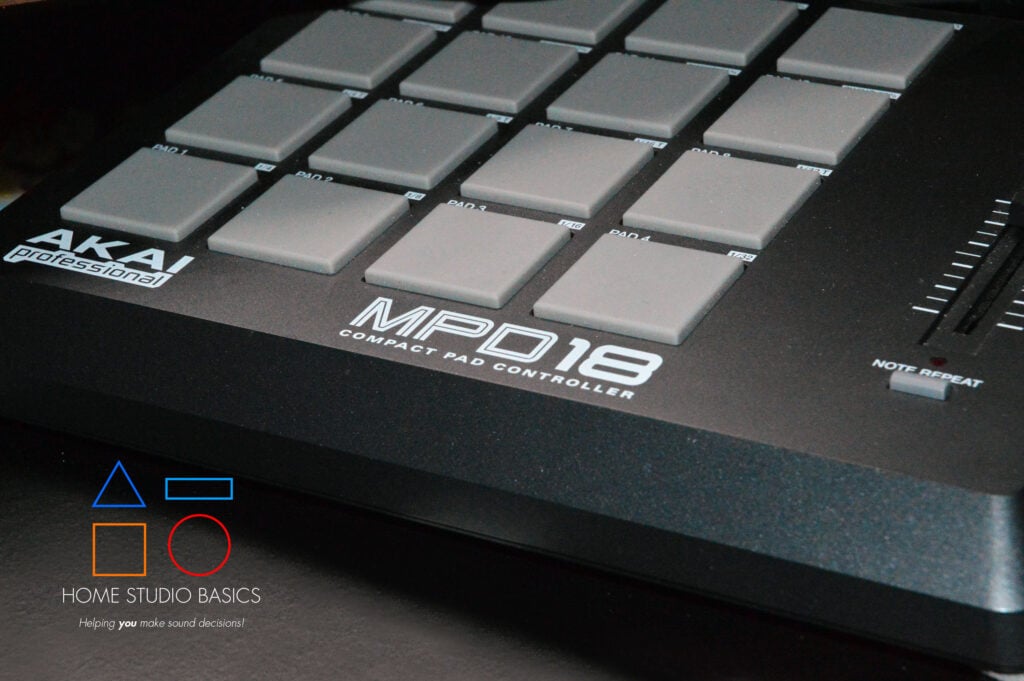
First off, the unit is built pretty well and feels fairly substantial. Weighing in at 1.76 lbs. it doesn’t feel like a toy but also isn’t overly bulky. The bottom contains rubber feet which help to keep it in place, and on the back, there’s a USB 2.0 slot.
The top reveals 16 Velocity & Pressure-Sensitive pads, MPC-Style Note Repeat, Full Level Function, Bank Select (A, B, C), a preset button, a MIDI Channel selector, and a fader.
The full-level function enables all samples to max out their loudness level which makes it much easier to bang out patterns without weird volume discrepancies. As you know, not every hit you make on a pad will be the same volume, so this feature is pretty much mandatory if you’re trying to sequence a pattern.
Overview
Setting it Up
It’s pretty simple to set up and works well with FL Studio.
- Plug it into your computer via USB.
- Your PC should recognize it as the MPD18.
- Open FL Studio.
- Go to Options > MIDI settings. This should be roughly the same for each, whether you’re using Pro Tools, Reason, etc. You just need to find the MIDI settings.
- Your device should show up. If it doesn’t, find where it says “Controller Type” and look for your device. If it still doesn’t show up, click where it says “Re-scan for MIDI device.”
- Click the yellow button that says “Enable.”
Assigning sounds in FL Studio:
- Go to Channels > Add One > FPC
- Drag a sample from your folder onto one of the pads. If you have sound packs, they will be under your browser on the left-hand side in FL Studio. If you’re dragging samples, refer to this guide on how to sample in FL Studio. The basic concept is the same whether you are using the MPD 18, The KORG padKONTROL, or something similar.
- Click the pad that you assigned the sound or sample to.
- Press the same pad on your MPD.
- Click next to Midi Note in the upper right-hand corner. Whatever note you played will appear (C3 for example).
- A big rectangular box will appear. Go all the way to the right where it says “last hit.”
- Click the pad to make sure it’s assigned!
Setup
The Cut By feature

A really powerful tool inside FL Studio is the Cut By feature.
After you’ve assigned sounds to the pad, they may overlap when you trigger them with your finger, leaving you in a heap of frustration.
All you want to do is bang out those samples but if every time you hit a pad, the same note plays, then you’re in for a headache! The Cut By allows for extreme flexibility and control. The solution is to change each of those values to 1. Voila!
Now make some magic happen baby!
Responsiveness

One of the main reasons I ended up selling the MPD18 is because of the pads themselves. They’re hard as a rock and never responded well for me; with or without the full-level button enabled.
One fix for this is adjusting the buffer length or sample rate inside of the audio settings. I did not know about this at the time but others have tried it with good results.
The trigger responsiveness is also very lackluster. You may experience delays in the trigger hits as well as ones that simply don’t register.
Perhaps I was spoiled by the padKONTROL’s incredible pads, but my time with the MPD18 didn’t last long.
Final Verdict

AKAI’s MPD18 was a compact, well-built unit that’s unfortunately very outdated. It’s also been discontinued.
If you’re looking for an amazing MIDI Keyboard made specifically for FL Studio, look no further than the Novation FL Key Mini. After using the padKONTROL for many years, I finally made the switch and couldn’t be happier.
Learn More:
Interested in a how-to guide on sampling in FL Studio?
Well that’s about it for today my friend! I hope you’ve enjoyed this AKAI MPD18 Review and came away with some valuable insight.
Questions? Comments? Requests? Did I miss the mark on something? Please Contact me!!
What do you think about the now-defunct MPD18? Is the FL Key Mini a better purchase? Any experience with the padKONTROL? I would love to hear from you. Until next time..
All the best and God bless,
-Stu
Be sure to check out my Reviews and Resources page for more helpful and informative articles!
Akai MPD18

Pros
- Durable
- Easy to Use
Cons
- Pads aren't sensitive
- Pads are too hard