How To Use Compression In FL Studio (Beginner’s Guide)
Greetings mate and Welcome aboard!
Stuart Charles here, HomeStudioBasics.com helping YOU make sound decisions, so…
Compression is one of the most misunderstood tools in music production.
Ask a beginner what it does, and you’ll likely hear something about making tracks louder.
Ask a seasoned engineer, and you’ll probably get a ten-minute explanation involving threshold, ratio, attack, release, knee, and gain reduction.
The problem is that neither explanation tells you what compression actually sounds like.
When I first started using compression in FL Studio, I understood the controls well enough, but I didn’t really understand why I was using it.
It wasn’t until I applied a compressor to an acoustic guitar and heard the notes seemingly hang in the air just a little longer that everything clicked.
Suddenly, the guitar sounded fuller, more present, and more polished. Not because it was louder, but because I could hear more of the performance. In other words, the nuances of it + the resolution really started to come through.
In this guide, we’ll explore what compression actually does, how it affects the sounds in your mix, and how to use FL Studio’s built-in compressors to achieve professional results.
More importantly, we’ll focus on hearing compression rather than simply memorizing settings, because once you understand what it’s doing to the sound itself, the controls begin to make a lot more sense like Common.
What Is Compression?
Core Idea: Compression reduces the difference between the loudest and quietest parts of a sound.
A compressor turns down the loud parts once they pass a certain level. After that, you can raise the overall signal, which makes quieter details easier to hear. This is why compression can make vocals feel more consistent, acoustic guitars sustain longer, bass lines sound more controlled, and drums feel tighter.
What Compression Sounds Like
Examples:
- Acoustic guitar: notes sustain longer, decay more smoothly, have a more noticeable release, and allow more of the note’s natural tail and detail to come through.
- Vocals: Quieter words become easier to hear.
- Bass: Notes become more even.
- Kick/Snare: Punch can be controlled or enhanced.
Main Compression Controls
Now that you have a basic understanding of what compression does, let’s examine the individual controls you’ll encounter in FL Studio and most other DAWs.
While the number of knobs and sliders may seem intimidating at first, every compressor is essentially performing the same task: reducing dynamic range by turning down signals that exceed a specified level.
Threshold
The threshold determines when compression begins.
Think of it as a line in the sand, like Walter from The Grand Lebowski. As long as the incoming signal remains below this level, the compressor does nothing.
Once the signal exceeds the threshold, compression is applied according to the ratio setting.
For example, if a vocal peaks at -6dB and your threshold is set to -12dB, the compressor will begin working whenever the signal rises above -12dB.
Lower thresholds generally result in more compression because a larger portion of the signal exceeds the threshold.
Ratio
The ratio determines how aggressively the compressor reduces volume once the signal crosses the threshold.
Common ratios:
- 2:1 – Light compression
- 3:1 – Moderate compression
- 4:1 – Firm compression
- 8:1 and higher – Heavy compression
- 20:1 or higher – Limiting
For example, with a 4:1 ratio, every 4dB that exceeds the threshold is reduced to 1dB at the output.
Higher ratios create a more controlled, consistent sound, while lower ratios generally sound more natural and transparent.
Try It Yourself
Here are a couple of quick math problems for you to solve:
A compressor has:
- Threshold: -12dB
- Ratio: 4:1
A signal peaks at:
- -4dB
Question: After compression, what level will the signal peak at?
Problem #2
- Threshold: -18dB
- Ratio: 2:1
- Signal Peak: -8dB
What is the output level after compression? Post your answers in the comments below.
A good rule of thumb is to simply start with a moderate ratio (2:1 to 4:1), then lower the threshold until you see roughly 3-5 dB of gain reduction on the loudest parts.
Here are some good starting points:
Vocals
- Ratio: 3:1 or 4:1
- Lower threshold until you see 3-6 dB of gain reduction
Acoustic Guitar
- Ratio: 2:1 or 3:1
- Lower threshold until you see 2-5dB of gain reduction
Bass
- Ratio: 3:1 or 4:1
- Lower threshold until you see 4-6dB of gain reduction
Attack
Attack controls how quickly the compressor reacts after the signal exceeds the threshold.
Fast attack times immediately clamp down on peaks and transients.
Slow attack times allow some of the initial transient to pass through before compression begins.
This setting has a major influence on punch and impact.
For example:
Fast attack can smooth out aggressive vocals.
Slow attack can preserve the pick attack of an acoustic guitar, or help a kick drum retain its punch.
Many beginners mistakenly use attack times that are too fast, which can make instruments sound lifeless or dull.
Release
Release controls how quickly the compressor stops compressing after the signal falls back below the threshold.
Fast release settings allow the compressor to recover quickly, while slow release settings keep compression active longer.
Release greatly affects the perceived sustain of a sound.
For example, when compressing an acoustic guitar, an appropriately set release can make notes seem to hang in the air longer, revealing more of the decay and natural tail of the performance.
If the release is too fast, compression may sound unnatural or pump noticeably.
Makeup Gain
Compression reduces volume; makeup gain restores it.
After applying compression, most signals become quieter because peaks have been reduced. Makeup gain allows you to raise the overall level so the compressed signal sits at a more appropriate volume.
This is one of the reasons compressed sounds often seem larger and more present. The compressor reduces peaks, and makeup gain raises everything back up.
As a result, quieter details become easier to hear.
Knee
The knee determines how gradually compression begins as the signal approaches the threshold.
A hard knee applies compression immediately once the threshold is crossed.
A soft knee introduces compression more gradually as the signal nears the threshold.
Soft knee settings generally sound smoother and more musical, especially on vocals and acoustic instruments.
Hard knee settings can create a more obvious, aggressive effect.
Gain Reduction
Gain reduction is not a control but rather a measurement of how much compression is occurring.
Most compressors display gain reduction on a meter.
For example:
- 1-3dB = Light compression
- 3-6dB = Moderate compression
- 6-10dB = Heavy compression
When learning compression, watching the gain reduction meter can help you understand how aggressively the compressor is working. More on that in a sec.
However, your ears should always make the final decision.
The goal isn’t to achieve a special number on the meter. It’s to improve the sound.
Using Compression In FL Studio
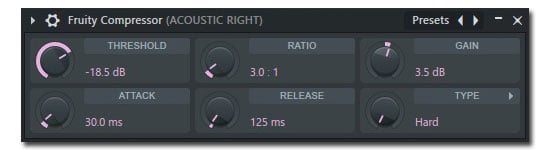
FL Studio includes several ways to compress audio, but for beginners, I recommend starting with Fruity Limiter in COMP mode.
While Fruity Compressor is perfectly capable and I use it, Fruity Limiter provides a more intuitive visual representation of what the compressor is doing, making it easier to understand concepts like threshold, ratio, attack, and release.
Adding A Compressor
- Open the Mixer by pressing F9
- Select the track you wish to compress.
- Click an empty effects slot.
- Choose Fruity Limiter.
- Click the COMP tab at the bottom of the plugin winder.
You should now see the compressor controls, including threshold, ratio, attack, release, and gain.
A Simple Starting Point
Before making any adjustments, try these settings:
- Ratio: 3:1
- Attack: 20ms
- Release: 100ms
- Gain: 0dB
Now play the audio and gradually lower the threshold.
What To Look For
As you lower the threshold, the compressor begins working more often because a larger portion of the signal exceeds the threshold value.
More importantly, you’ll notice the gain reduction display responding to the incoming audio. This visual feedback allows you to see exactly when compression is occurring and how aggressively it is being applied.
For many sources, a good starting point is approximately 3-5 dB of gain reduction during the loudest sections.
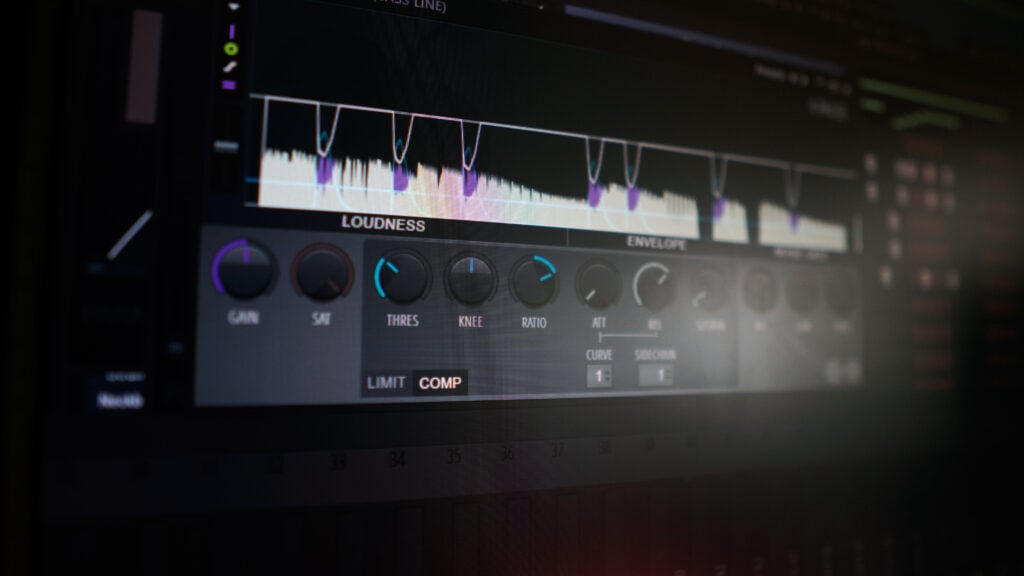
Seeing Compression In Action
One advantage of Fruity Limiter’s COMP mode is that it provides a visual representation of compression as it occurs.
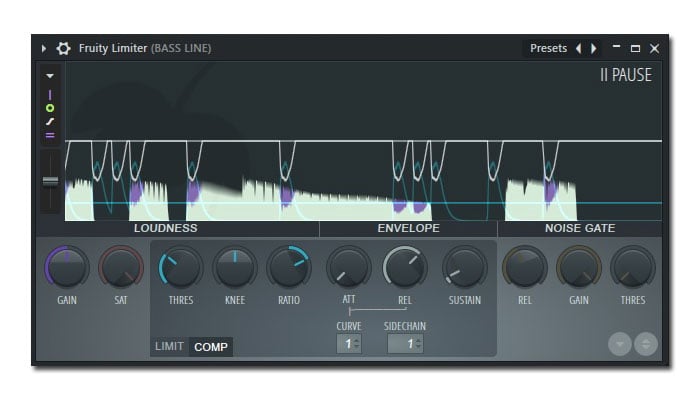
As you lower the threshold, watch the central display while audio is playing. You’ll notice the incoming signal interacting with the compression curve more frequently as a larger portion of the audio exceeds the threshold.
This visual feedback can help reinforce what you’re hearing. As more of the signal crosses the threshold, the compressor works harder to reduce dynamic range. Likewise, increasing the ratio makes that reduction more aggressive.
Don’t worry too much about interpreting every movement on the display. Instead, use it as a learning tool. The goal is to connect what you’re seeing with what you’re hearing as the sound becomes more controlled, consistent, and polished.
What To Listen For
Rather than focusing exclusively on numbers, pay attention to how the sound changes.
For example, when compressing an acoustic guitar, you may notice increased sustain, smoother decay, a more audible release, greater clarity in the notes’ natural tail.
In other words, the note seems to hang in the air longer before fading away.
Vocals often become more consistent, bass lines more controlled, and drums more focused.
Trust Your Ears
While visual feedback is helpful, your ears should always make the final decision.
If compression improves the sound, helps the instrument sit better in the mix, and achieves the desired effect without introducing unwanted artifacts, you’re moving in the right direction.
The gain reduction meter provides useful information, but it cannot tell you whether the result is musically appropriate. That’s your job as the producer, engineer, or musician.
Well, that’s about it for today my friend! I hope you’ve enjoyed this article on How To Use Compression In FL Studio and came away with some valuable insight.
Questions? Comments? Requests? Did I miss the mark on something? Please let me know down below or Contact me!!
If you love what I do here and want to support the blog and channel in a more personal way, check me out on Patreon and discover all the value I have to offer you.
Just want to make a one-time donation? Click here. Your support is greatly appreciated and helps keep this site running!
Do you have a better grasp of all this? I would love to hear from you. Until next time…
All the best and God bless,
-Stu
[Xtr@Ba$eHitZ] > Now AudioFiles Anonymous
Can’t decide which headphones to purchase? Interested in a complete buyers guide outlining over 40 of the best options on the market? Click on over to the best audiophile headphones to learn more!!
Be sure to also check out my Reviews and Resources page for more helpful and informative articles!
![How to Sample In FL Studio – A Complete Guide [Part IV/BPM, Piano Roll, Step Sequencer, & Playlist]](https://homestudiobasics.com/wp-content/uploads/2026/02/How_To_Sample_In_FL_Studio_4_Redo-768x432.jpg)


