Fruity Delay 3 Tutorial: Every Control Explained + Best Settings
Greetings mate and Welcome aboard! Stuart Charles here, HomeStudioBasics.com helping YOU make sound decisions, so…
Using Fruity Delay 2 instead? I’ve also written a separate tutorial covering the older plugin, including how to set it up and start experimenting with delay in FL Studio.
Check out my Fruity Delay 2 tutorial here.
If you’ve spent any time producing music in FL Studio, you’ve probably come across Fruity Delay 3, one of the DAW’s stock effects plugins designed to create everything from subtle echoes and slapback effects to spacious, rhythmic delays.
But with controls for feedback, modulation, filtering, distortion, and stereo manipulation, figuring out exactly what everything does can be a little confusing, especially if you’re just getting started.
That’s where I come in.
In this guide, we’ll break down Fruity Delay 3’s interface, explain what each control does, and explore some practical settings for vocals, instruments, and mixing.
By the end, you’ll have a much better understanding of how to use the plugin and, more importantly, how to dial in the exact delay effect you’re looking for.
Let’s dive in.
What Is Fruity Delay 3?
Before we start fiddling with knobs, it would probably help to establish what we’re actually doing.
Delay is an audio effect that takes an incoming signal and repeats it after a specified amount of time.
Seems simple, right?
WRONG!
It’s actually quite complex, and you can do loads of neat stuff with it, but for now, let’s say you’ve recorded a vocal and want the last word of a particular phrase to echo a few times before fading into the background.
Rather than recording the word over and over again, you can use a delay plugin to generate those repetitions automatically.
But here’s where things get interesting.
We can control how quickly the echoes repeat, how long they continue, how loud they are, and even how they move around the stereo field.
We can also filter and distort the repetitions, creating everything from clean, natural-sounding echoes to darker, more atmospheric effects that almost take on a life of their own.
And that’s precisely what makes Fruity Delay 3 so fun.
Unlike a basic delay plugin that only provides a few controls, Delay 3 gives us considerably more flexibility without requiring any additional third-party software.
And since it’s included with FL Studio, there’s no reason not to experiment with it.
How To Add Fruity Delay 3 In FL Studio
First things first, eager beaver.
Open up an FL Studio project containing something you’d like to add delay to.
For this demonstration, I’ll be using an Inspectah Deck sample, but the same process applies to guitars, synths, percussion, and just about anything else you can think of.
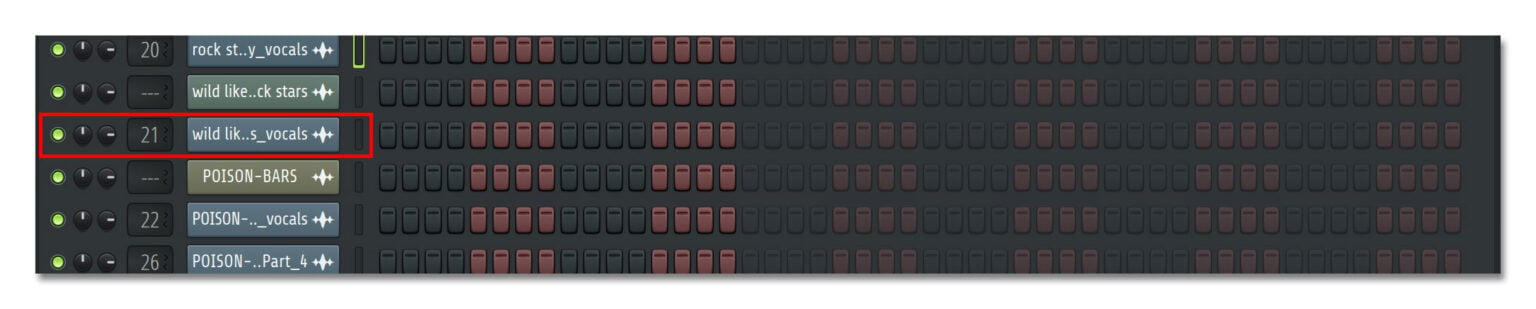
Hit F6 to bring up your channel rack.
From here, select the audio sample you want to work with and assign it to a mixer track using the track assignment box.
If you’ve already routed everything, you’re good to go.
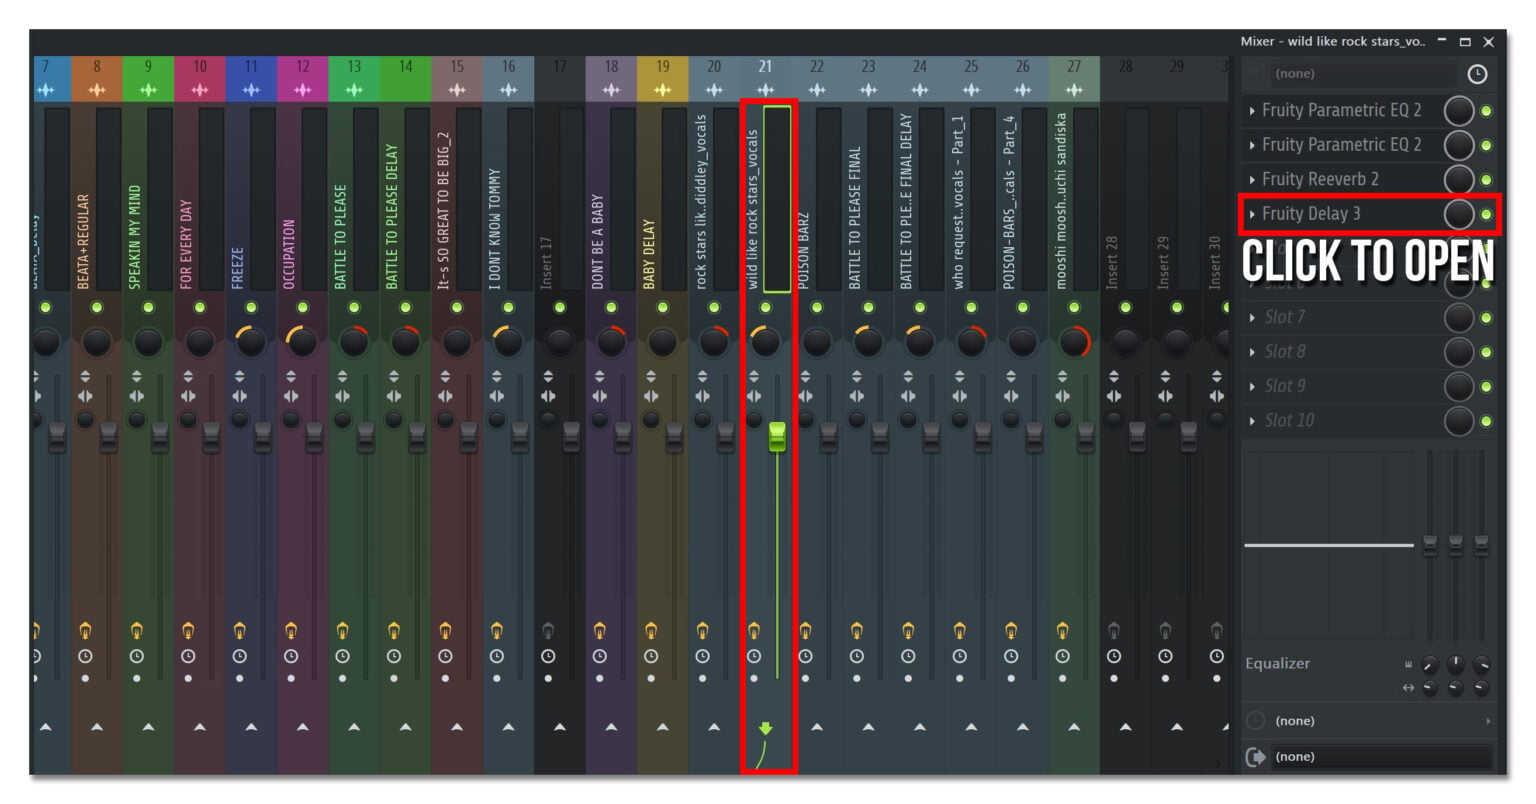
Now hit F9 to bring up the mixer.
Select the appropriate insert, head over to the effects rack on the right, and click an empty slot.
Search for Fruity Delay 3 and select it.
That’s it! You should now see the plugin interface.
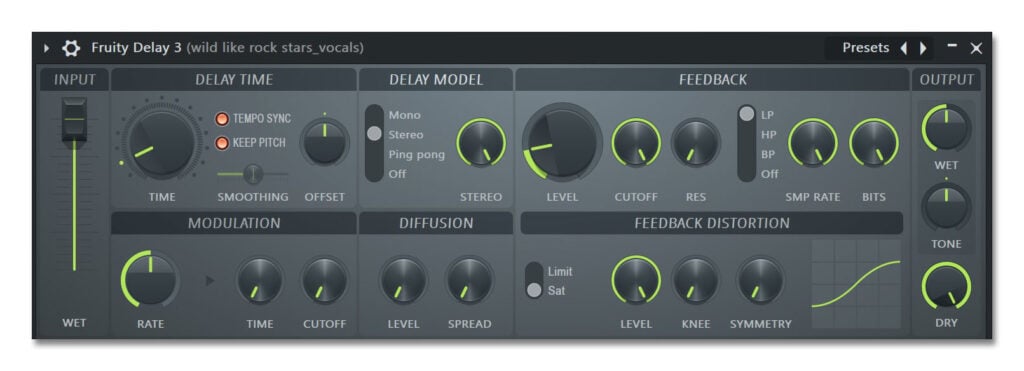
At first glance, there are quite a few knobs, buttons, and other doodads staring back at you, but don’t fret.
We’re going to break everything down into manageable pieces so you understand not only what each control does, but how it actually affects the sound.
And more importantly, we’ll be using our ears rather than blindly copying settings and hoping for the best.
Fruity Delay Interface Explained
Before changing anything, play your sample with the plugin enabled and listen to how the delay interacts with the original signal.
Then bypass the effect and listen again.
This is something I always recommend when working with EQ, compression, reverb, or any other effect inside FL Studio.
We need to understand what we’re hearing before making an informed decision about whether the adjustment is actually helping. Otherwise, you’re just turning knobs for the sake of it.
With that, let’s take a closer look at the individual controls.
Delay Time
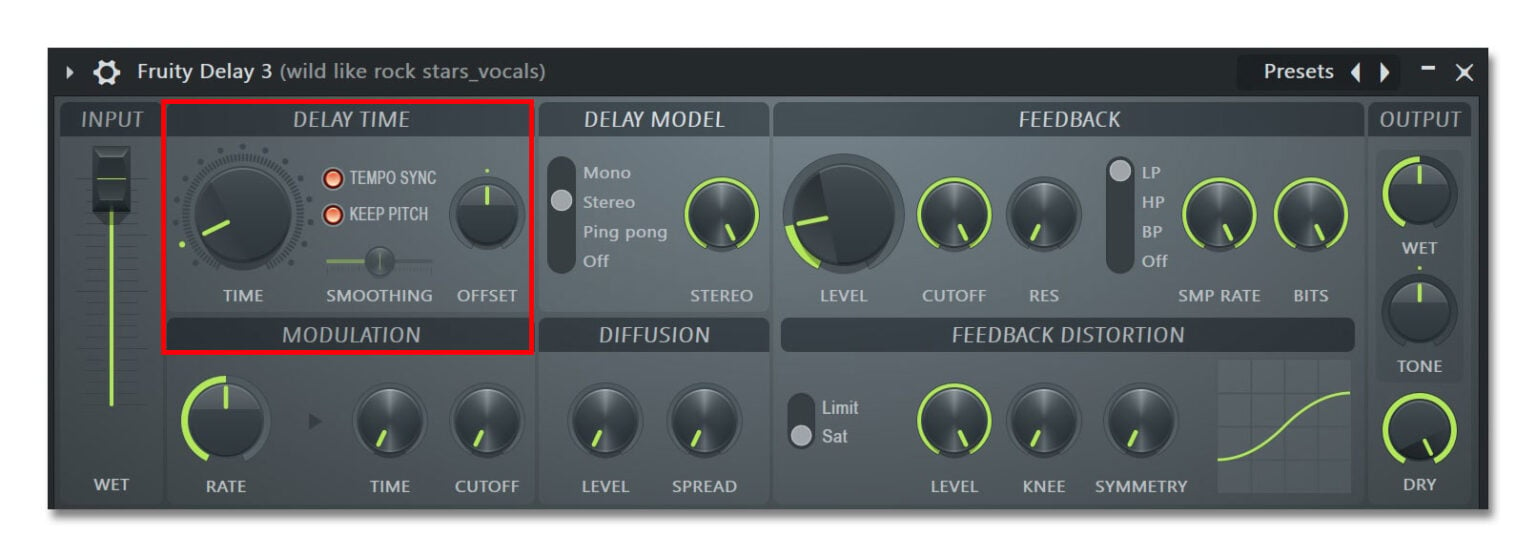
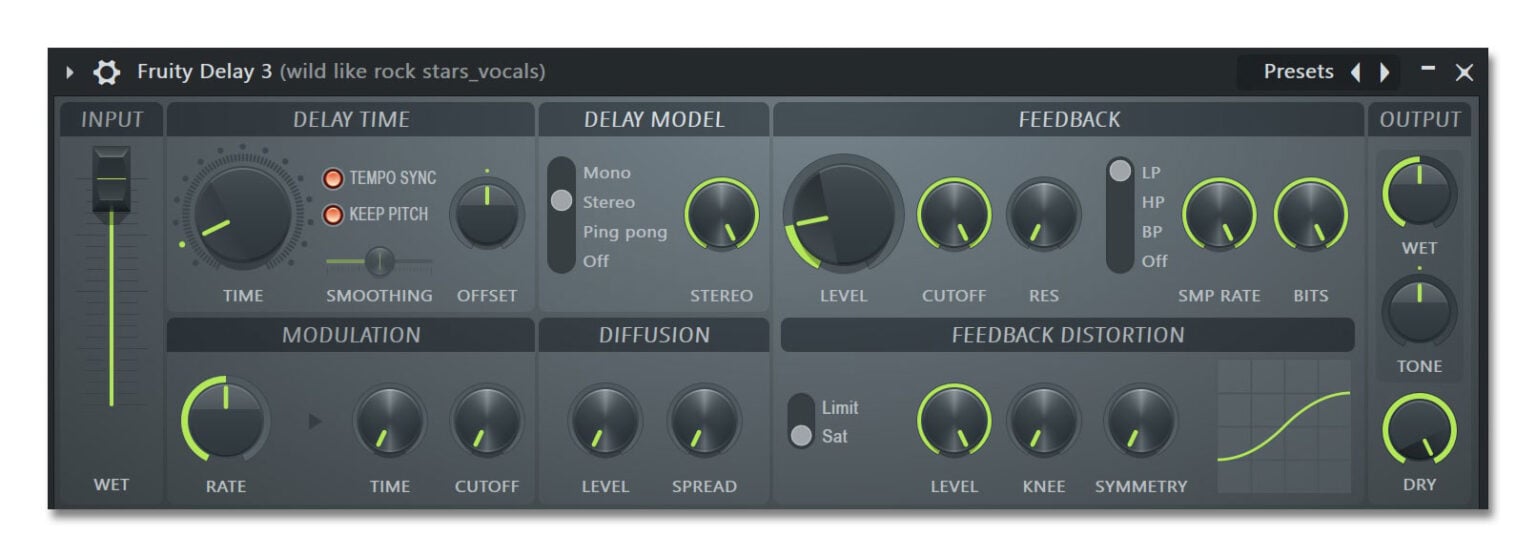
Perhaps the most important setting to understand is Time, which determines how long the plugin waits before producing a delayed repetition.
Shorter delay times create closely spaced echoes, while longer settings produce more noticeable gaps between the original sound and its repetitions.
This is very track-dependent, and the amount can vary wildly, so don’t be afraid to hone in on exactly what works.
In your head, you may think something is going to sound correct, and it doesn’t in practice, causing you to make the adjustment until it sits right in the mix.
For example, a very short delay can create a doubling effect, making a vocal sound a little thicker or wider without necessarily producing an obvious echo.
Longer delays, meanwhile, can be synchronized with the tempo of your track to create rhythmic repetitions that complement the beat.
And this is where things start getting fun.
Rather than randomly adjusting the timing and hoping everything lines up, we can use the plugin’s tempo-related settings to make the delay work with the music instead of fighting against it.
The important thing to remember is that there’s no universally correct delay time.
A setting that sounds fantastic on one vocal might be completely wrong for another, especially if the tempo, phrasing, or surrounding instruments are different.
My advice?
Start with the timing, listen to how the repetitions interact with the original signal, and adjust from there.
We’ll explore some specific samples later in the guide.
Feedback Level
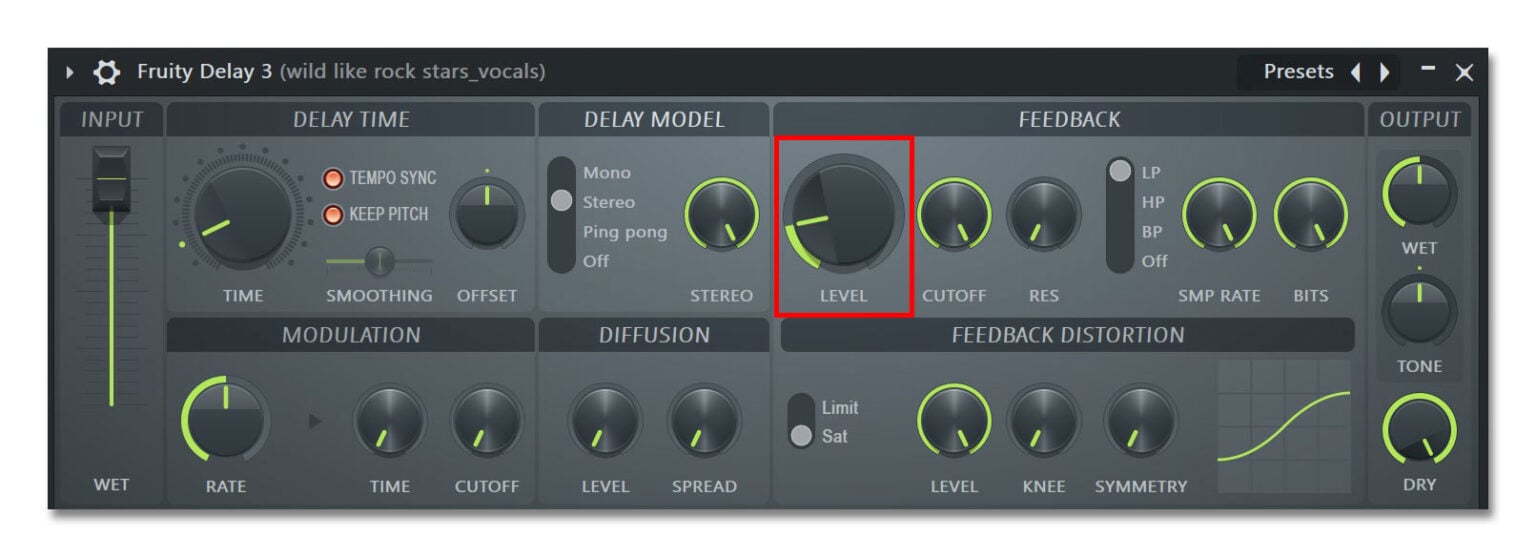
Next up is Feedback, and this is where we determine how many times our original sound repeats before fading away.
Think of it this way:
Delay Time determines when the echoes occur, while Feedback determines how long they continue.
At lower settings, you’ll hear fewer repetitions, which is useful when you want to add a little depth without drawing too much attention to the effect.
Increase the Feedback, and those repetitions continue for longer before eventually disappearing.
Pretty straightforward.
For an upcoming track I’m working on called “The Freeze,” I used Fruity Delay 3 on an Inspectah Deck vocal sample, specifically the line “Wild like rock stars who smash guitars.”
The goal wasn’t to create some enormous echo that took over the entire mix.
I simply wanted to beef up the sample a bit and give it some additional dimension.
After experimenting, I settled on a Time setting of 2:0 with Feedback around 5–10%.
The result was subtle, but effective.
In fact, one of the things I noticed was that the sample had more body, even though the actual echoes weren’t necessarily all that obvious.
And that’s something worth remembering: You don’t always need an exaggerated effect to make a meaningful difference.
Sometimes a little goes a long way.
Wet and Dry
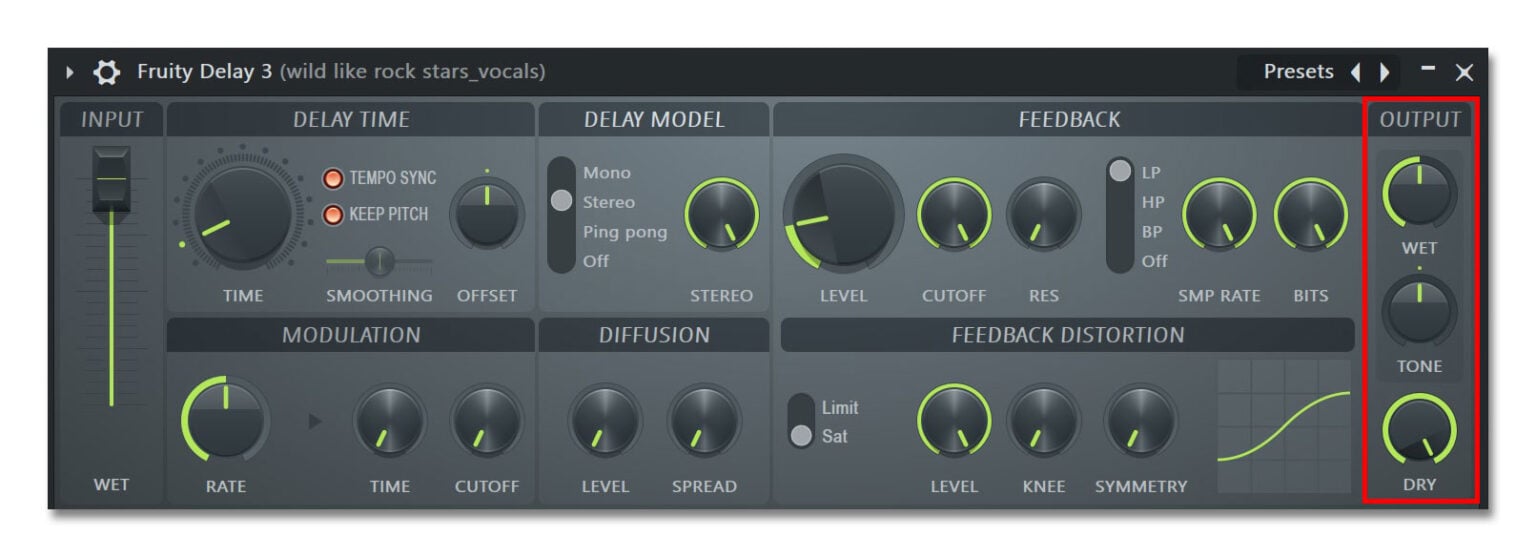
Now that we’ve established how the echoes behave, we need to control how much of the effect we’re actually hearing.
This is where the Wet and Dry controls come into play.
Wet refers to the processed signal, or in this case, the delay itself.
Dry refers to the original, unaffected audio.
If you increase the Output Wet level, the echoes become more prominent.
Reduce it, and the effect starts to sit further in the background.
Meanwhile, the Output Dry knob determines how much of the original signal passes through the plugin.
For “The Freeze,” I kept the Dry signal at 100% while setting the Output Wet level around 12–18%.
This allowed the original vocal to remain front and center while the delay provided some additional texture underneath.
But here’s where things get interesting.
Sometimes you’ll dial in a delay and notice that the sample sounds fuller, thicker, or has a little more presence, but you can’t necessarily hear the repetitions themselves.
That’s pretty much what happened with “The Freeze.”
I liked the additional body the effect was providing, but I also wanted the echoes to be just a little more noticeable.
So, what do you do?
Simple.
Start increasing the Output Wet knob until you can clearly hear the repetitions, then gradually dial it back until the effect sits comfortably underneath the original sample.
You’re essentially looking for that sweet spot where the delay is subtle enough that it doesn’t interfere with the vocal, but noticeable enough that you’d miss it if you turned the plugin off.
For the beat in question, one subtle delay tail is perfect for what I’m going for. This called for a bump up to around 40% for the output wet parameter.
And speaking of which, that’s one of the easiest ways to determine whether the effect is actually doing anything useful.
Toggle Fruity Delay 3 on and off while the track is playing.
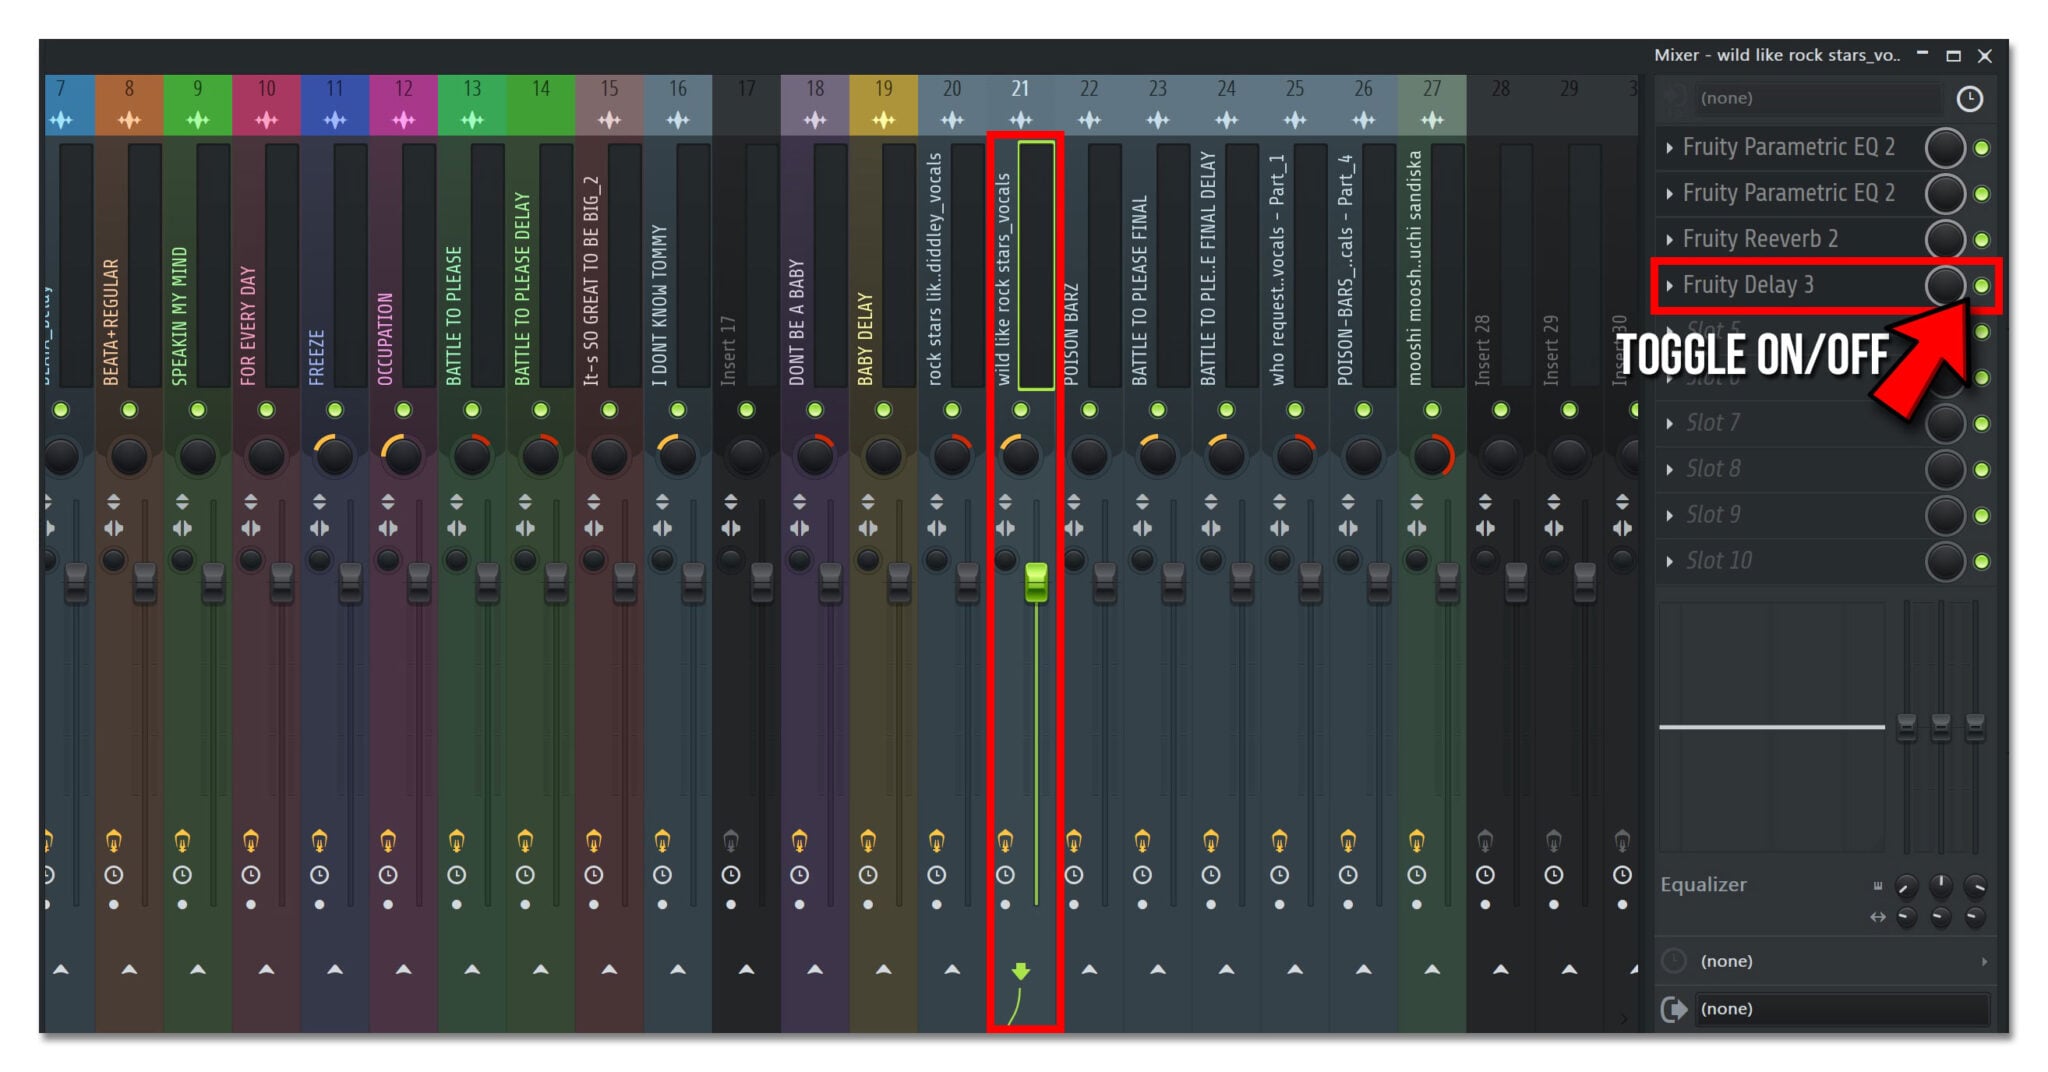
Does the vocal sound a little flatter or less interesting without it?
If so, you’re probably on the right track.
The idea isn’t necessarily to make the delay obvious. It’s to make the original sound better.
One other thing worth mentioning is that Fruity Delay 3 also has an Input Wet control.
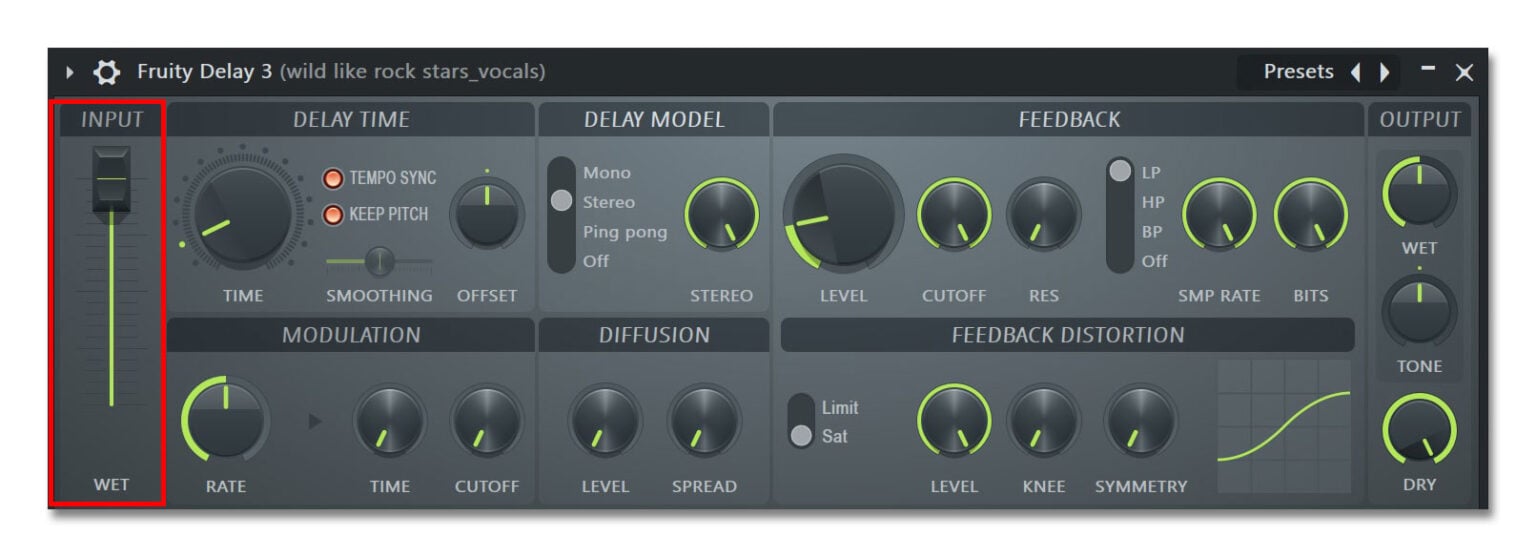
This determines how much audio enters the delay processing section in the first place, whereas Output Wet controls how much processed audio you hear afterward.
For most basic applications, I’d concentrate on Output Wet and Dry first.
Delay Model: Mono, Stereo, and Ping Pong
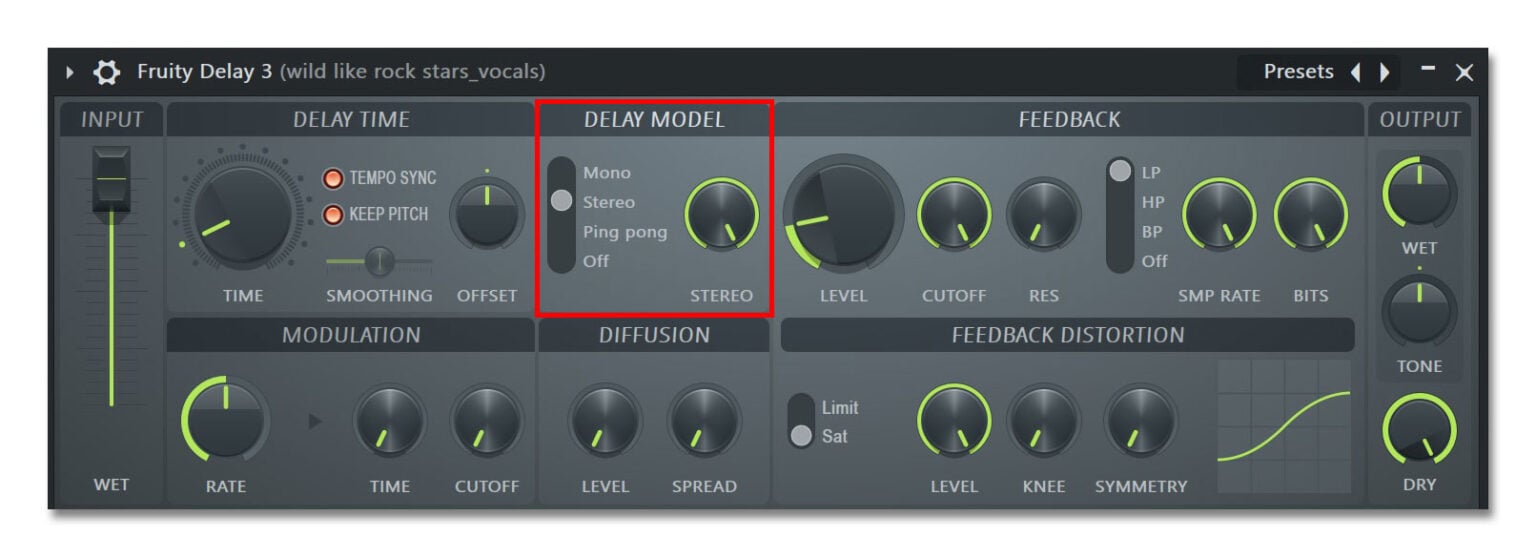
Another important setting is the Delay Model, which determines how the echoes behave across the stereo field.
You have three main options:
Mono: Combines the left and right channels into a mono delay signal. Useful when you want the repetitions to remain relatively focused.
Stereo: Processes the left and right channels separately, preserving the stereo information of the original signal.
Ping Pong: Creates echoes that alternate between the left and right channels.
That last one can be especially interesting on vocals, synths, and other sounds where you want a little movement.
Instead of hearing the repetitions coming from the same general location, they appear to bounce back and forth.
For “The Freeze,” I used Stereo because I wasn’t necessarily looking for that exaggerated left-to-right movement.
I just wanted the sample to sound a little fuller.
My advice would be to experiment with all three modes while listening through headphones.
The differences should become apparent pretty quickly.
Filtering: Cutoff and Tone
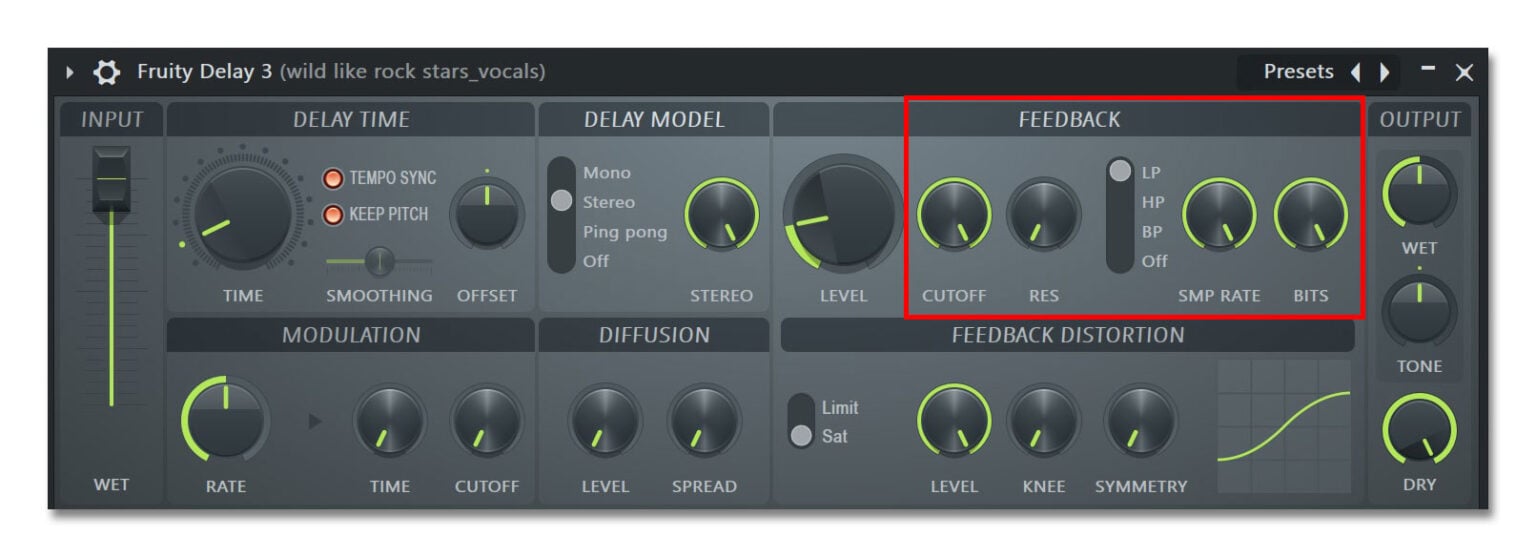
One of the problems with delay is that the repetitions can start competing with the original audio, particularly when there’s a lot happening in the mix.
This is where filtering becomes useful.
Under the Feedback section, you’ll find options for adjusting the frequency content of the echoes.
For example, selecting a Low Pass filter allows you to reduce higher frequencies, making the repetitions sound darker and less prominent.
A High Pass filter does the opposite, reducing lower frequencies that might otherwise contribute to a muddy mix.
There’s also a Band Pass option, which emphasizes a particular range of frequencies.
The Cutoff knob determines where the selected filter operates, while Resonance emphasizes frequencies around that cutoff point.
Keep in mind that the Feedback filter affects the sound as it repeats, meaning each successive echo can become progressively more filtered.
You can also use the Tone knob in the Output section to filter the final wet signal.
Personally, I think this is one of those areas where it’s easy to get carried away.
Start with the delay sounding the way you want it, and then use filtering if the repetitions are getting in the way of the original sound.
There’s no reason to adjust every single parameter just because it’s there.
What About Modulation, Diffusion, and Distortion?
You may have noticed that Fruity Delay 3 includes quite a few additional controls we haven’t discussed.
These include Modulation, Diffusion, and Feedback Distortion.
While they aren’t necessarily essential for basic delay effects, they can be a lot of fun to experiment with.
Here’s the rundown.
Modulation introduces movement into the delay by changing its timing or filter cutoff over time. This can create subtle pitch fluctuations, wobbling effects, and sounds reminiscent of older tape equipment.
I actually experimented with this on one of my vocal samples, and sure enough, adjusting the modulation produced a strange, warbly quality that made the echoes sound a little unstable.
Pretty neat!
Diffusion spreads and smears the repetitions, making them sound less like individual echoes and more like a wash of sound. Think of it as adding a reverb-like quality to the delay.
Feedback Distortion allows you to introduce saturation or limiting into the feedback path, potentially giving the repetitions a grittier, more aggressive character.
Now, this one was interesting.
When I first started experimenting with distortion, I could barely hear any difference at all, even after increasing both the main Feedback Level and the distortion amount.
But after some additional tweaking, I finally landed on a combination that worked:
- Feedback Distortion Level: Around 20-22%
- Output Wet: 50%
- Main Feedback Level: 100%
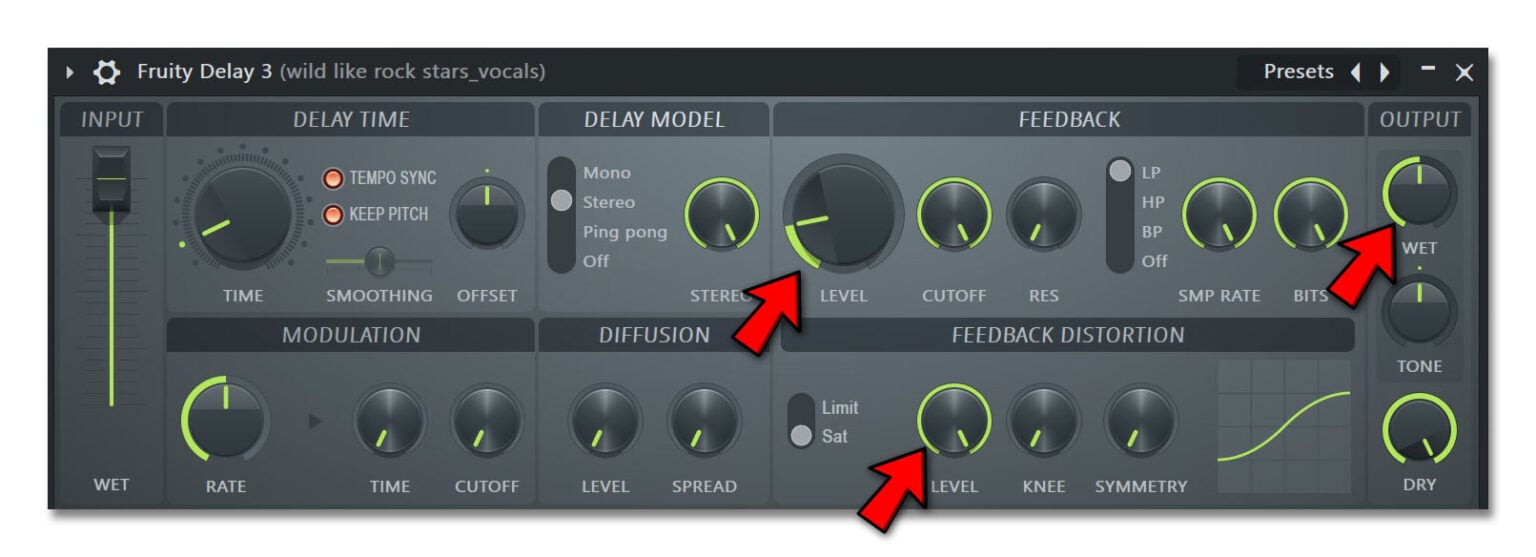
And wouldn’t you know it, the sample took on a subtle, slightly distorted character that sounded pretty cool.
Nothing ridiculously over-the-top, mind you, but just enough grit to give the repetitions some additional personality.
Keep in mind that increasing Feedback to 100% can cause repetitions to continue for a very long time, so you’ll want to monitor how the effect behaves throughout the track.
Also, remember that these settings aren’t necessarily going to produce identical results on every sample.
A lot depends on the source material, your Delay Time, and how everything interacts with the rest of the mix.
But that’s part of the fun, isn’t it?
Sometimes you have to fiddle around for a while before stumbling onto something that works.
And in this case, that’s exactly what happened.
Closing Thoughts
And there you have it!
As you can see, Fruity Delay 3 is capable of quite a bit more than simply repeating a sound over and over again.
Whether you’re looking to add some subtle body to a vocal, create a rhythmic echo, or experiment with something a little more strange and atmospheric, there’s plenty here to keep you busy.
And if there’s one thing I’ve learned from using it in my own productions, it’s that the smallest adjustments can sometimes make the biggest difference.
With “The Freeze,” I wasn’t looking for anything particularly elaborate. I just wanted the sample to have a little more presence, and after some trial and error, I found a setting that worked.
That’s really what this is all about.
Don’t get too caught up in numbers, presets, or what someone else thinks you should be doing.
Use your ears, experiment, and figure out what sounds right for the track you’re working on.
Sometimes you’ll want the delay to be front and center. Other times, you may barely notice it’s there until you turn it off.
Both approaches are perfectly valid.
Well, that’s about it for today, my friend. I hope this helped you better understand Fruity Delay 3 and how to incorporate it into your own music.
Questions? Comments? Requests? Did I miss the mark on something? Please let me know down below or Contact me!!
If you love what I do here and want to support the blog and channel in a more personal way, check me out on Patreon and discover all the value I have to offer you.
Have you had any experience mixing with headphones? Are there any headphones you would add or take away? I would love to hear your thoughts. Until next time…
All the best and God bless,

-Stu
Can’t decide which headphones to purchase? Interested in a complete buyers guide outlining over 40 of the best options on the market? Click on over to the best audiophile headphones to learn more!!
Be sure to also check out my Reviews and Resources page for more helpful and informative articles!